
You come back from a shoot with 600 frames. Half are burst duplicates. Eighty have someone blinking. Thirty are soft because you were wide open in low light and the autofocus picked the wrong eye. The actual keepers — the ones you’d ever open in an editor — are maybe ninety. Finding those ninety by hand is the most mind-numbing part of photography.
SnapGrade is a fully local web app that does that triage for you. It scores every frame for sharpness, exposure, blink detection, composition, and burst similarity, then hands back a verdict — keeper, review, or reject — and a star rating. It picks the best frame from each burst. It clusters faces so you can pull every shot of one person. It writes XMP sidecars that Lightroom, darktable, and Capture One read directly. The whole thing runs on your laptop: no subscription, no upload, no vendor lock-in.
Six Things SnapGrade Catches That You’d Miss at 3 a.m.
“Automatic culling” can mean a lot of things. SnapGrade is not a black-box AI verdict — it runs a set of transparent, measurable checks, and every one of them is visible and tunable:
| Signal | What it catches |
|---|---|
| Sharpness (Laplacian + Tenengrad) | Out-of-focus shots, camera shake, motion blur |
| Blink / closed-eye detection | Any face with eyes below the open threshold |
| Exposure | Blown highlights, crushed shadows, overall luma |
| Composition | Horizon tilt, rule-of-thirds offset |
| Burst similarity (perceptual hash) | Near-duplicate frames from rapid-fire shooting |
| Aesthetic score (optional, CoreML) | NIMA-based perceived quality — opt-in only |
Each check contributes a weighted score. If you shoot portraits and closed eyes are a hard reject, weight that signal heavily. If you shoot landscapes where blinks are irrelevant, turn it off. The thresholds live in a single Settings screen, and changing them re-rates the whole library in milliseconds.
Two Commands, Then Coffee
SnapGrade needs Python 3.11+ and uv. Clone, sync, serve:
git clone https://github.com/Bibyutatsu/SnapGrade
cd SnapGrade
uv sync --all-extras
uv run snapgrade serve
The UI opens at http://127.0.0.1:8765. Everything from here is point-and-click.
Drop a Folder. Walk Away.
The first screen is Library — a single intake form titled Open a roll. Point it at a folder, pick which optional models to enable for this pass, and start.
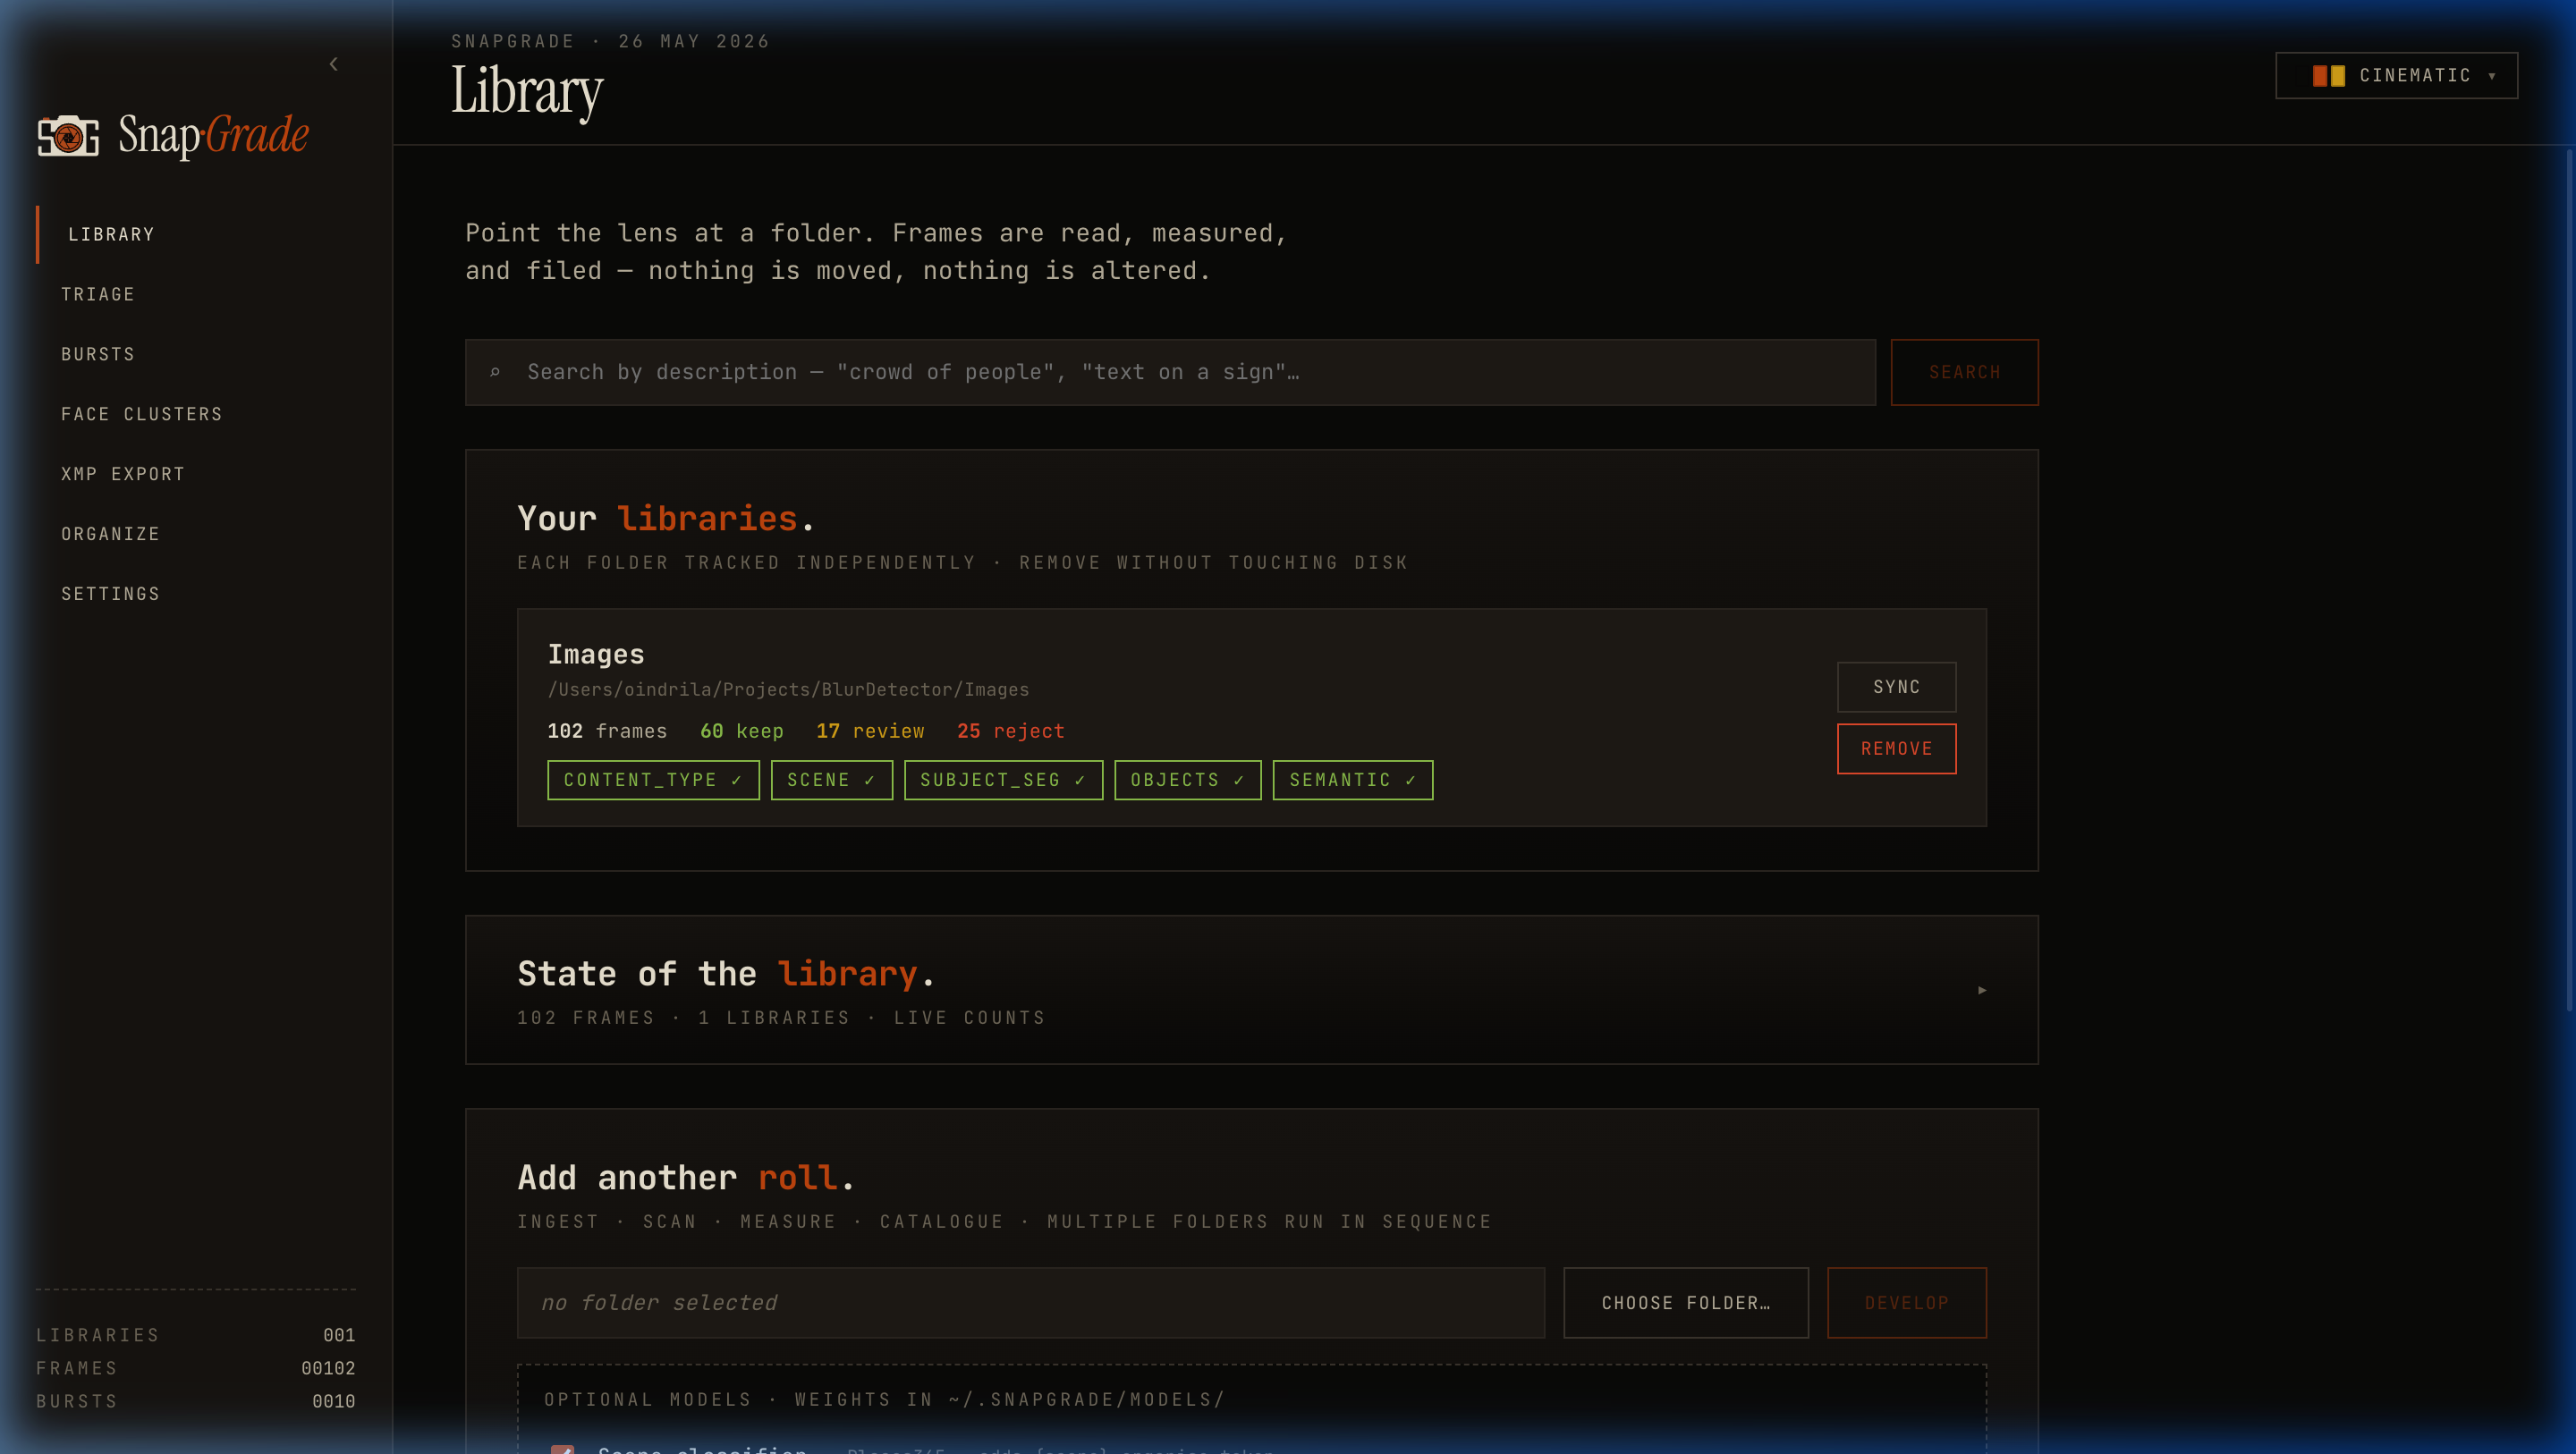 The Library intake. Pick a folder, opt into the heavier models you actually need, and choose whether to run burst grouping and face clustering afterwards.
SnapGrade walks the folder recursively, decodes each image (JPEG, HEIC, RAW), runs the analysis pipeline, and writes results to a local SQLite database at ~/.snapgrade/library.db. Progress is live. Re-running on the same folder is fast — anything whose modification time hasn’t changed is skipped entirely.
Below the intake form sits a semantic search field labeled Search by description. If you opted into semantic indexing, type something like “golden hour portrait” or “wide angle mountain” and SnapGrade returns the visually closest matches using local MobileCLIP embeddings — no API call, no upload.
The Contact Sheet, but It’s Already Sorted
Triage is the main working view, branded as The Contact Sheet. Images in a grid, verdict chips on every thumbnail (green for keeper, yellow for review, red for reject), star ratings overlaid. The top bar holds folder switching, verdict tabs, a timeline scrubber, and the layout/theme toggles.
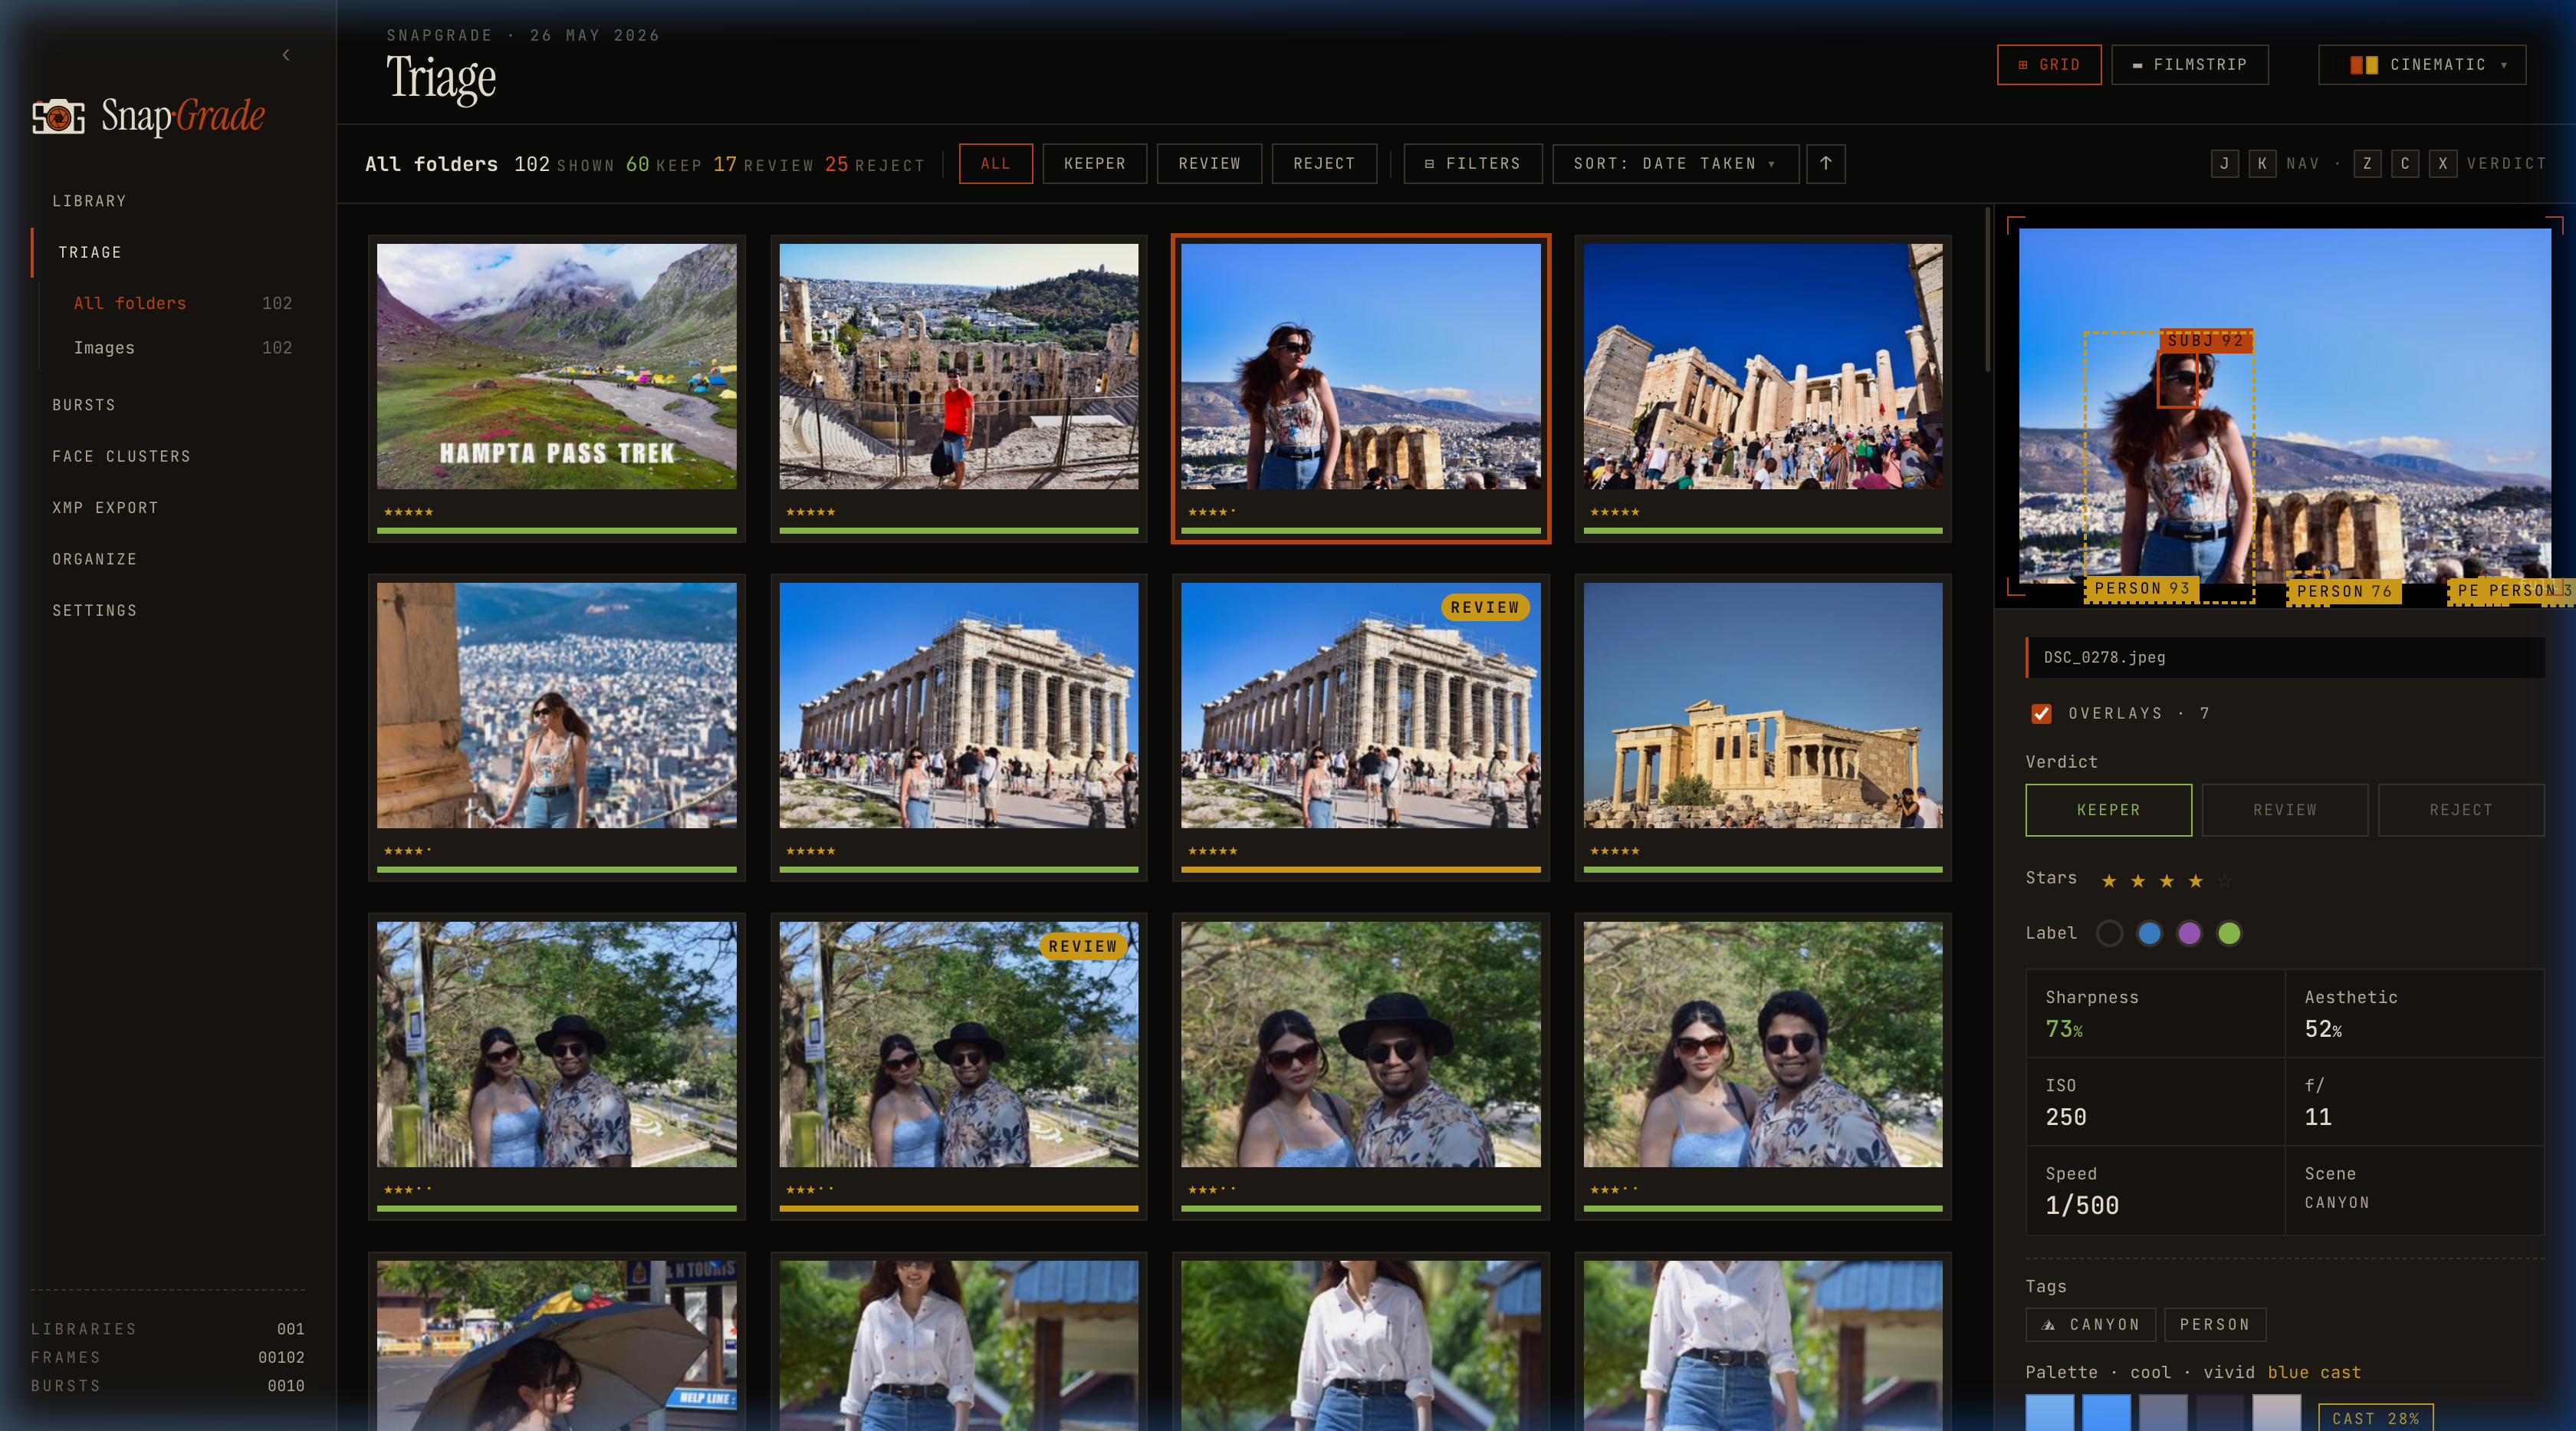 The Contact Sheet in Grid view. Verdict chips and stars overlay each thumbnail; the right-side detail panel surfaces full EXIF, the verdict, and the per-image reasons.
Grid vs. Filmstrip
Two layouts toggle from the top bar:
- Grid — a dense contact sheet for scanning.
- Filmstrip — the active frame in a large central workspace with a horizontal strip of thumbnails along the bottom. Arrow keys move through frames instantly.
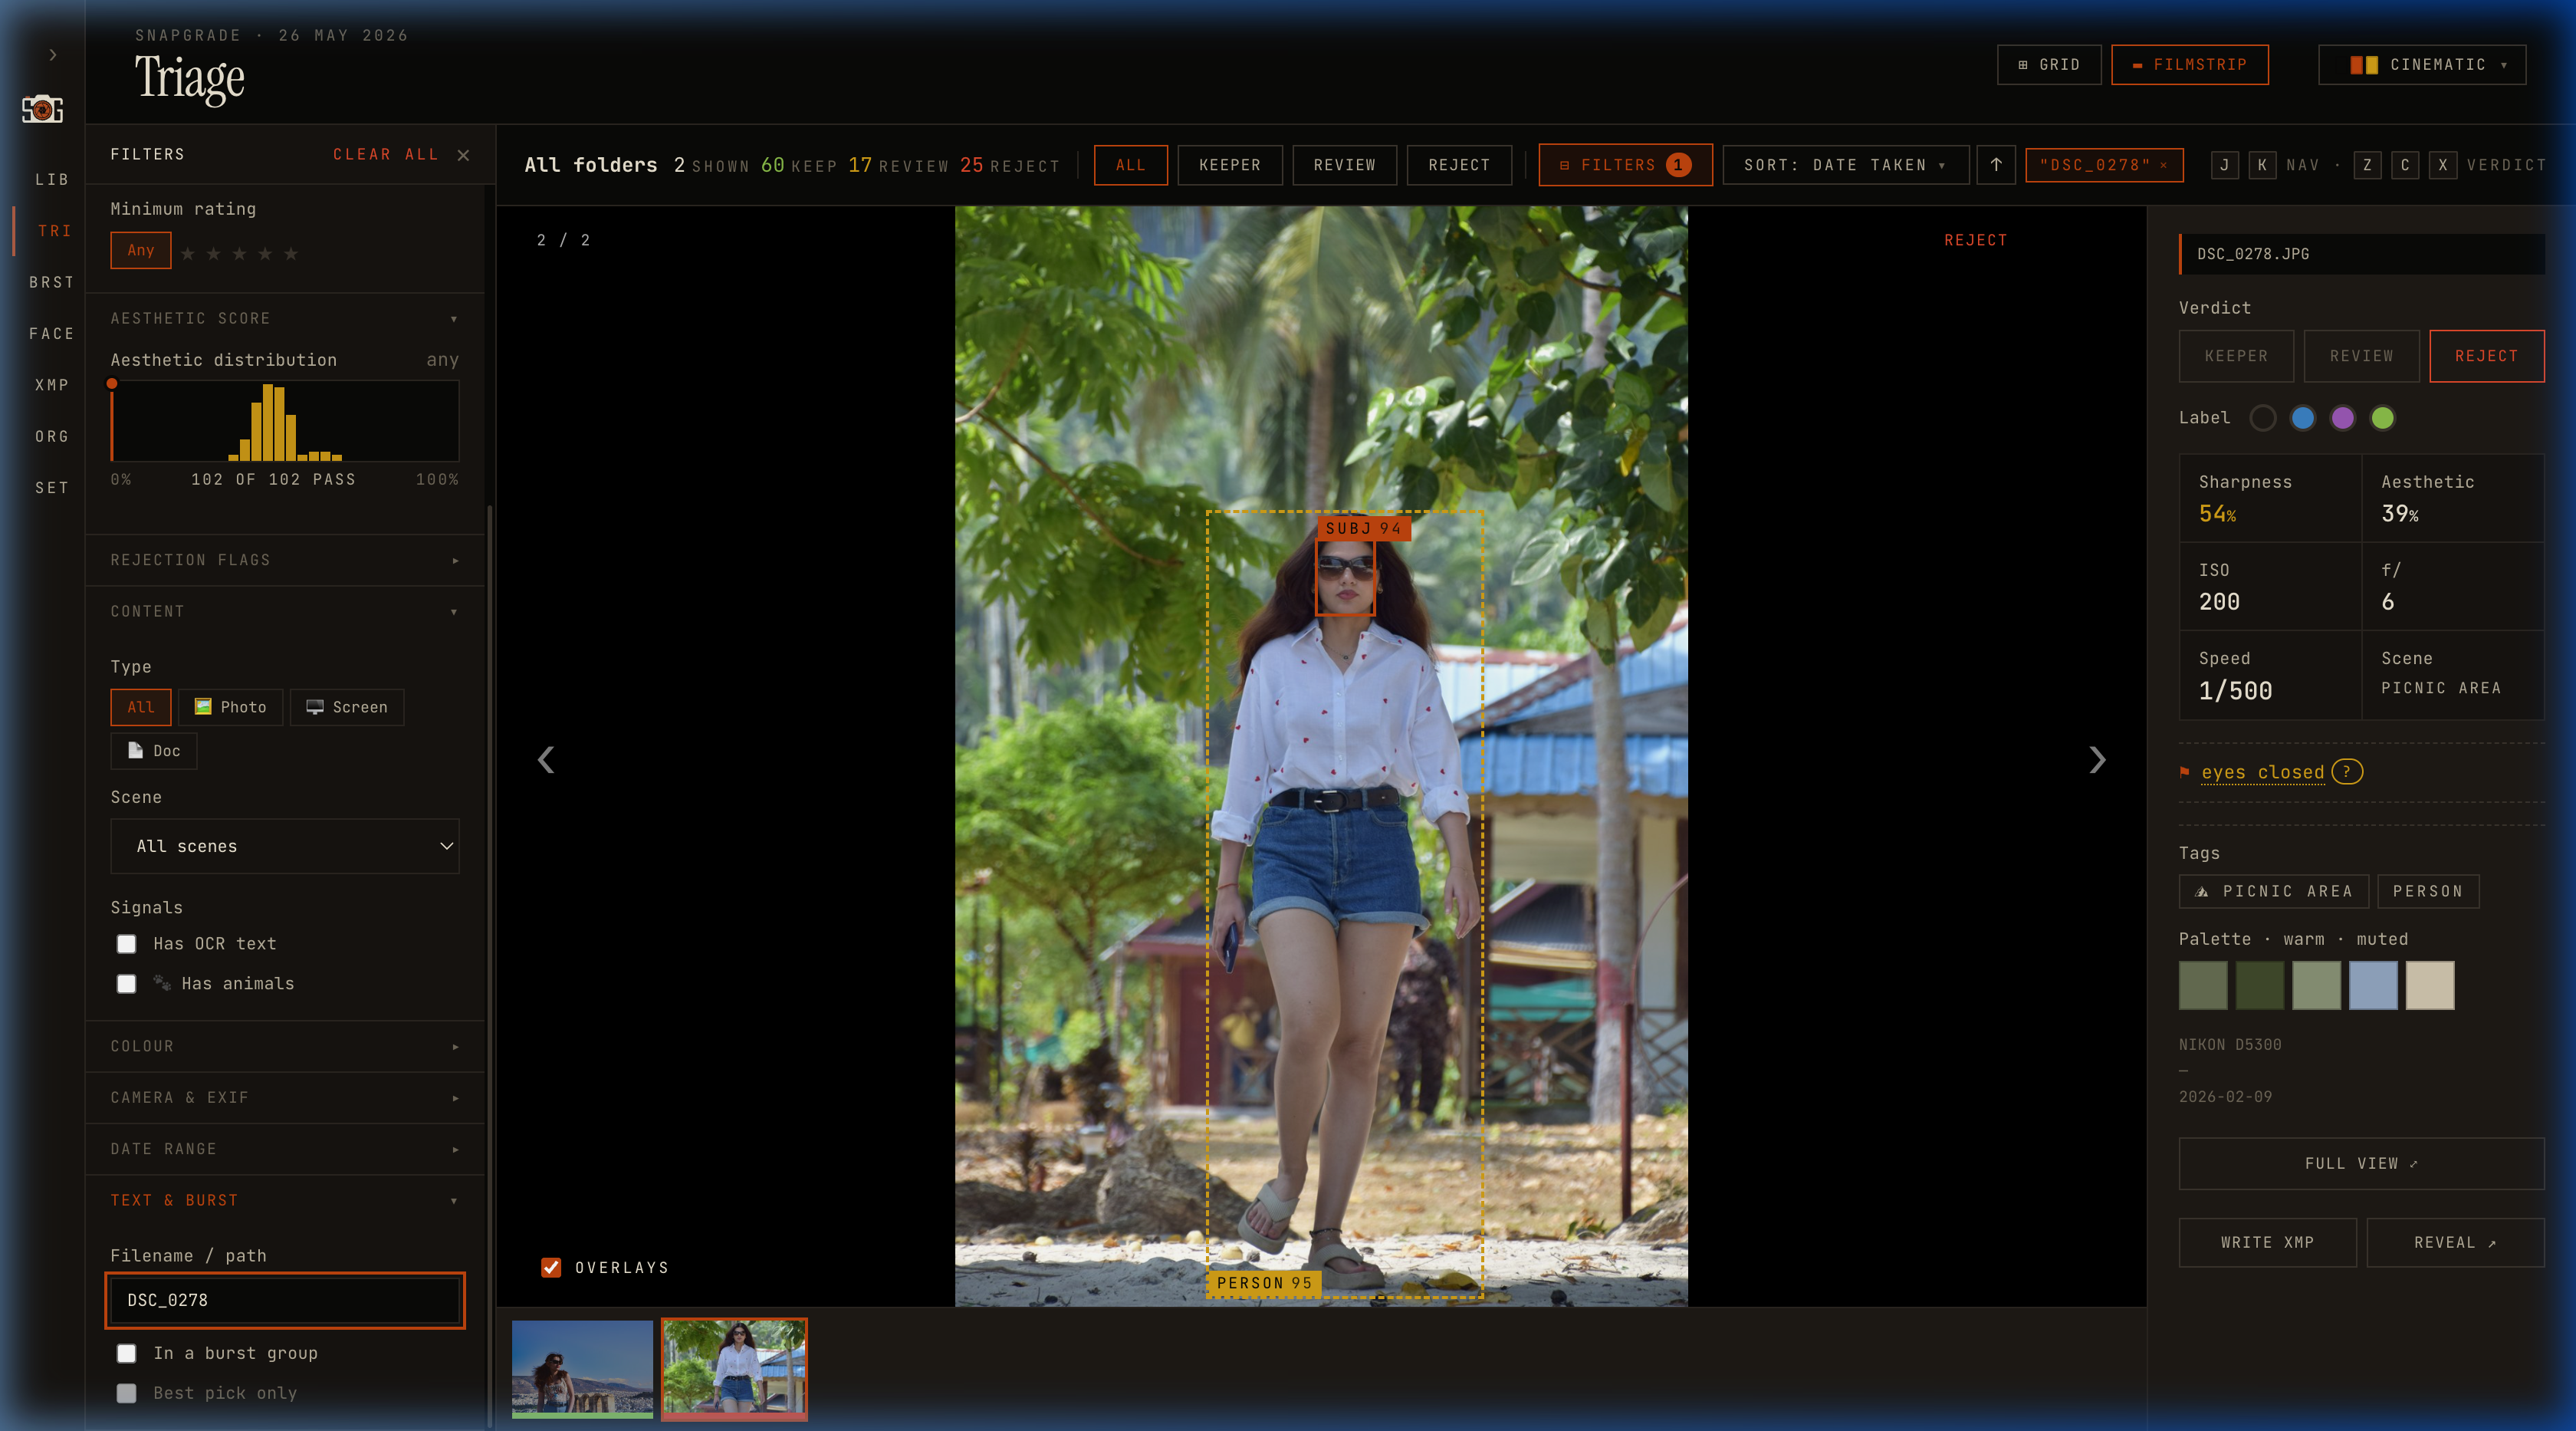 Filmstrip mode: one hero frame, a thumbnail strip for navigation, and the detail panel on the right.
See Exactly What the Analyzer Looked At
When a frame is selected, SnapGrade overlays the bounding boxes it actually used during analysis — the subject regions detected by MediaPipe face detection or the saliency fallback. Those boxes are what the sharpness metric was computed on. Seeing them lets you verify the autofocus landed where you wanted it.
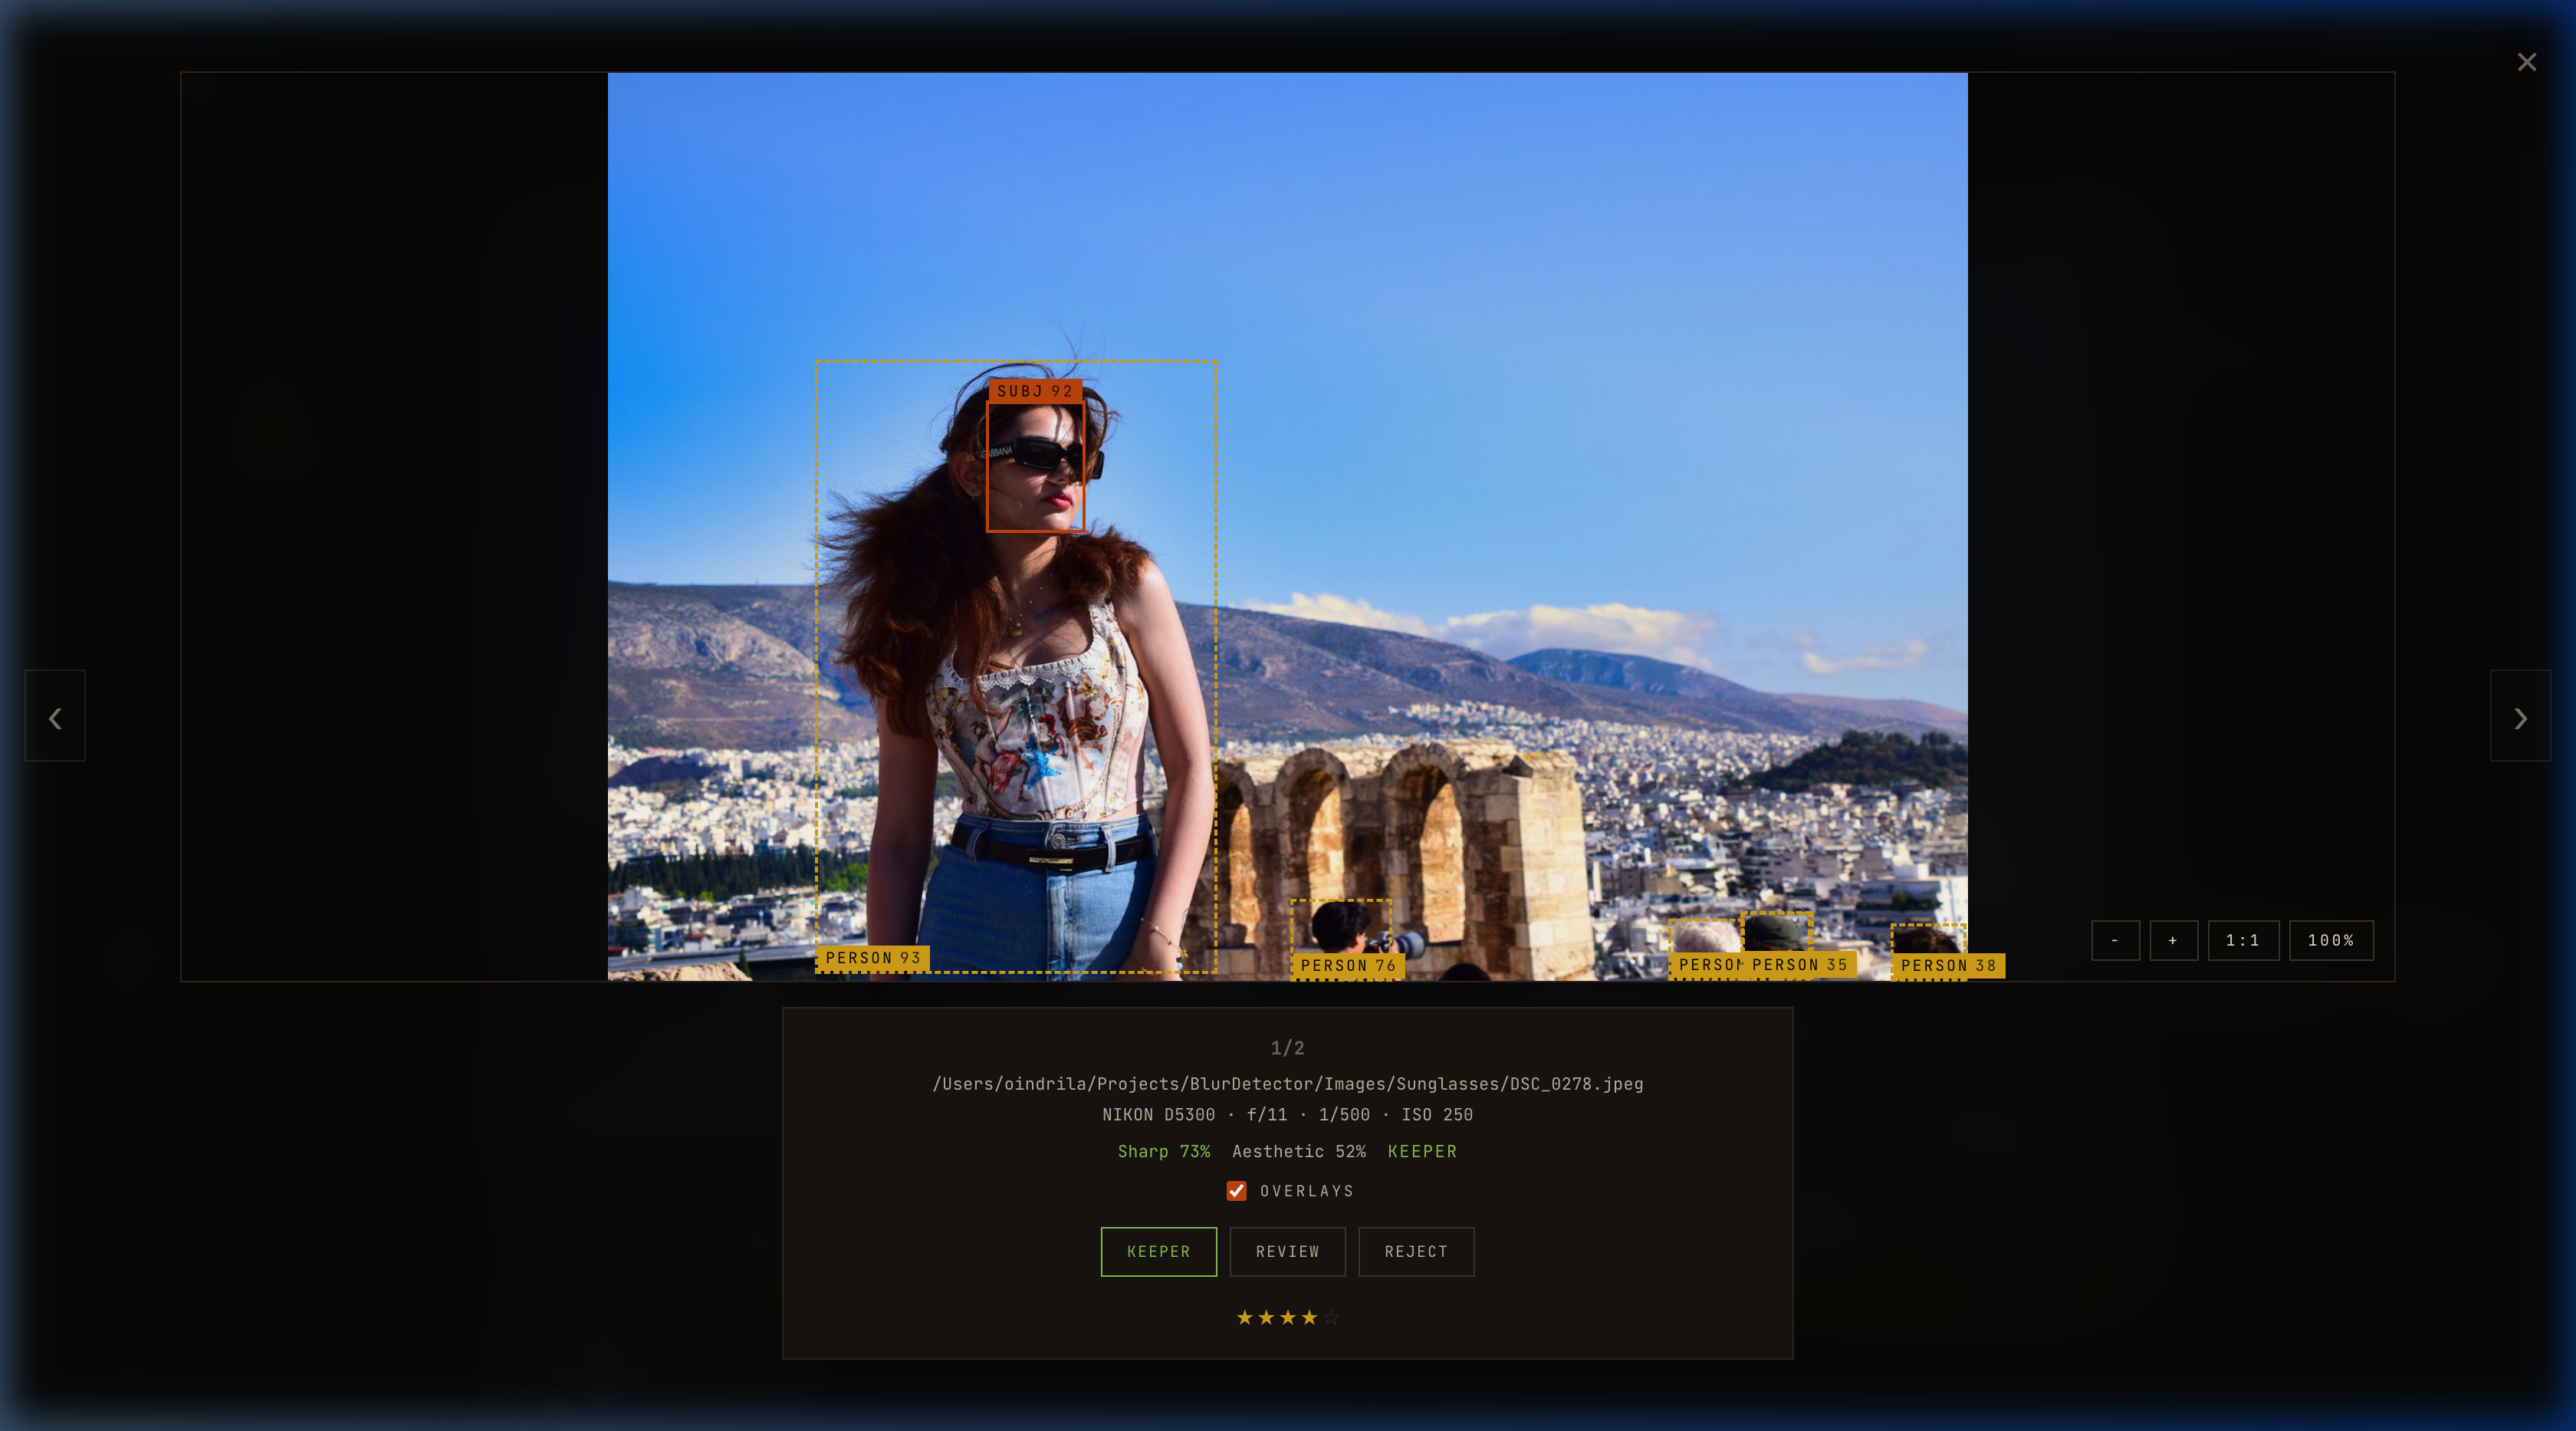 Lightbox view with subject overlays on. The orange and white boxes are the exact regions used for subject-aware sharpness scoring.
Filters That Stack
The left-side filter panel collapses by default. Open it for the full surface — every dimension SnapGrade indexes.
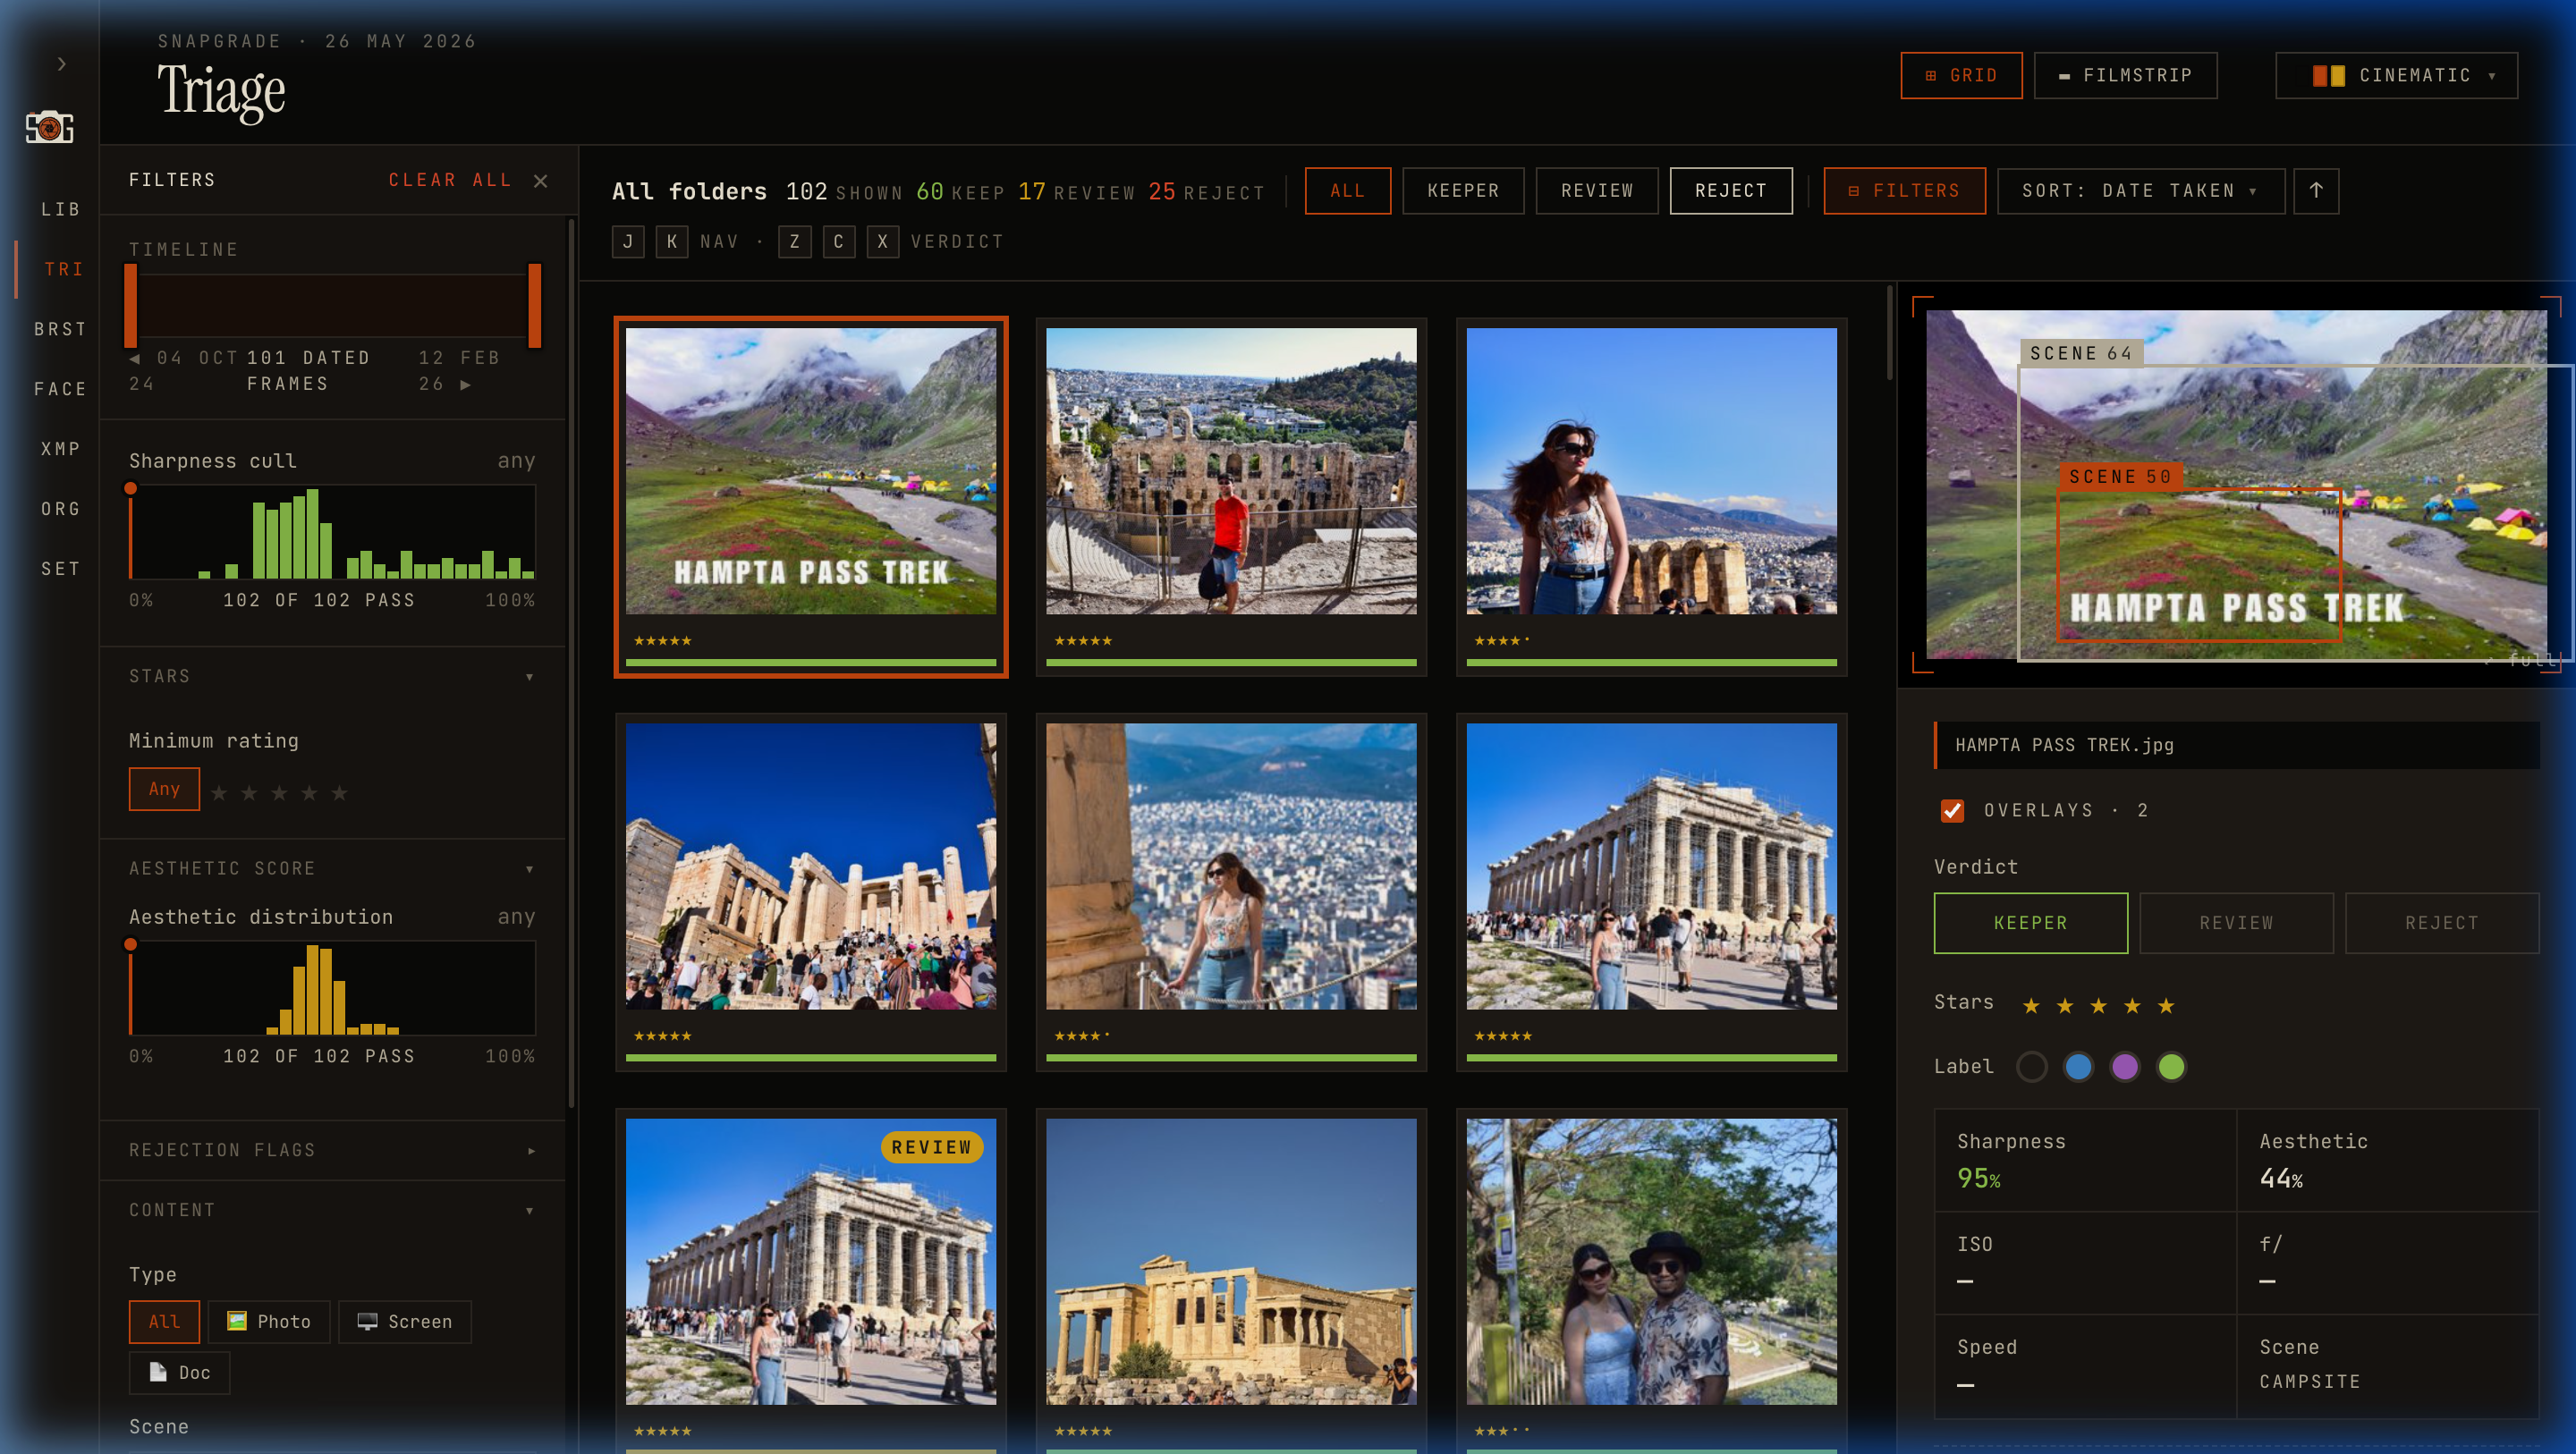 The full Triage filter surface. Sharpness and aesthetic histograms double as visual sliders; the colour wheel lets you anchor on dominant hues.
What you can filter on:
- Verdict, stars, quality histograms (drag-to-range sliders on live sharpness/aesthetic distributions)
- Rejection flags: blur, closed eyes, over/underexposure, horizon tilt — each independently toggleable
- Content type: photos vs. screenshots vs. documents
- Scene: indoor, outdoor, night, food, etc.
- OCR / animals: filter to frames with detected text or animals
- Colour palette: anchor on dominant hues using the colour wheel, with a ± degree tolerance slider
- Camera / ISO / aperture / orientation — standard EXIF
- Date range via the timeline scrubber or explicit from/to
- Burst only / best-of-burst to collapse the grid to one frame per group
Filters stack. “All keepers shot at ISO ≥ 3200 with a warm cast and at least 4 stars” is three clicks.
600 Frames In, 90 Frames Out
If you shoot bursts — sports, kids, anything fired at 6–10 fps — the Bursts screen is where the real time saving happens.
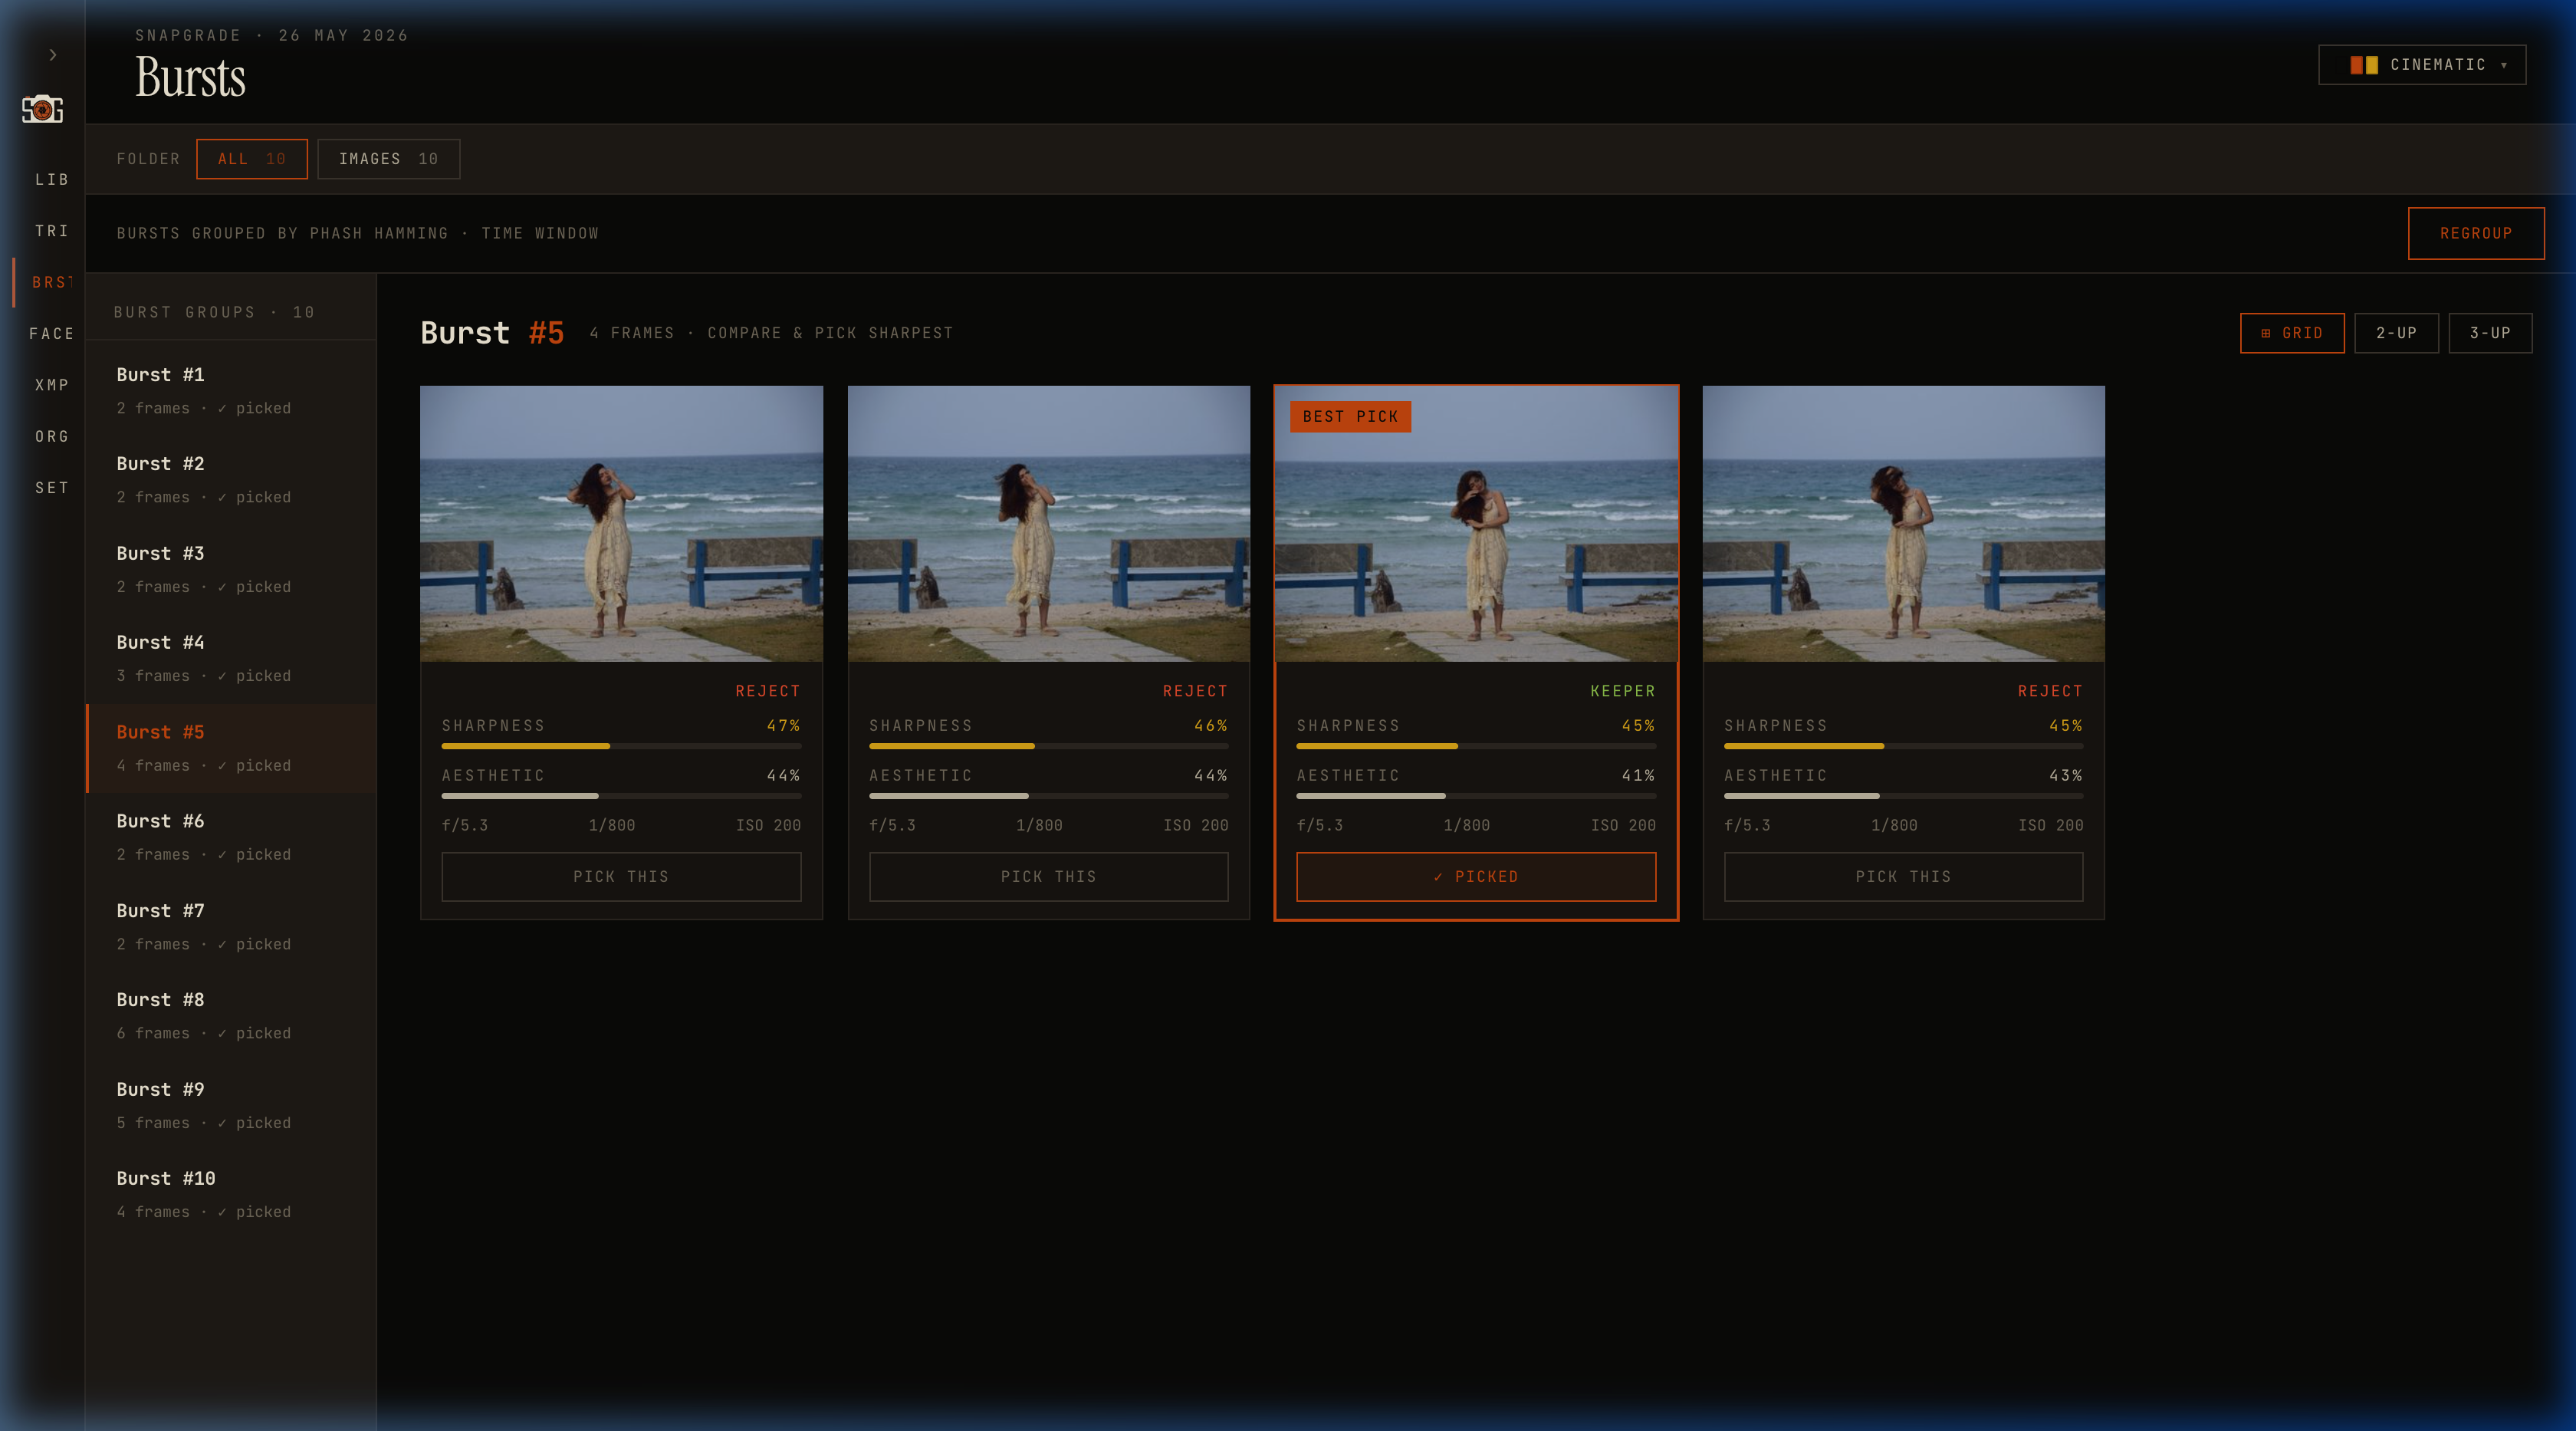 Burst Comparison. SnapGrade picks one BEST frame per group based on a weighted score; you can override the pick.
SnapGrade groups burst frames by perceptual hash similarity and capture timestamp. Within each group, it ranks frames by a weighted score (sharpness 45%, exposure 12%, aesthetic 13%, eye openness 20%, smile 10%) and marks the top frame as best-of-burst. Filter the Triage view to best-of-burst only and a 600-frame shoot collapses to the ninety that actually matter — before you’ve done any manual work.
Grouping is tunable. By default, frames shot within 3 seconds with a perceptual hash distance under 10 bits count as the same burst. Loosen both from the CLI: snapgrade group --hamming 14 --seconds 30.
Every Face in Your Library, Grouped
Face Clusters groups detected faces using local embeddings (InsightFace buffalo_s) and greedy cosine similarity. Every distinct person gets a cluster card; click View all to filter the photo grid to every shot featuring that person.
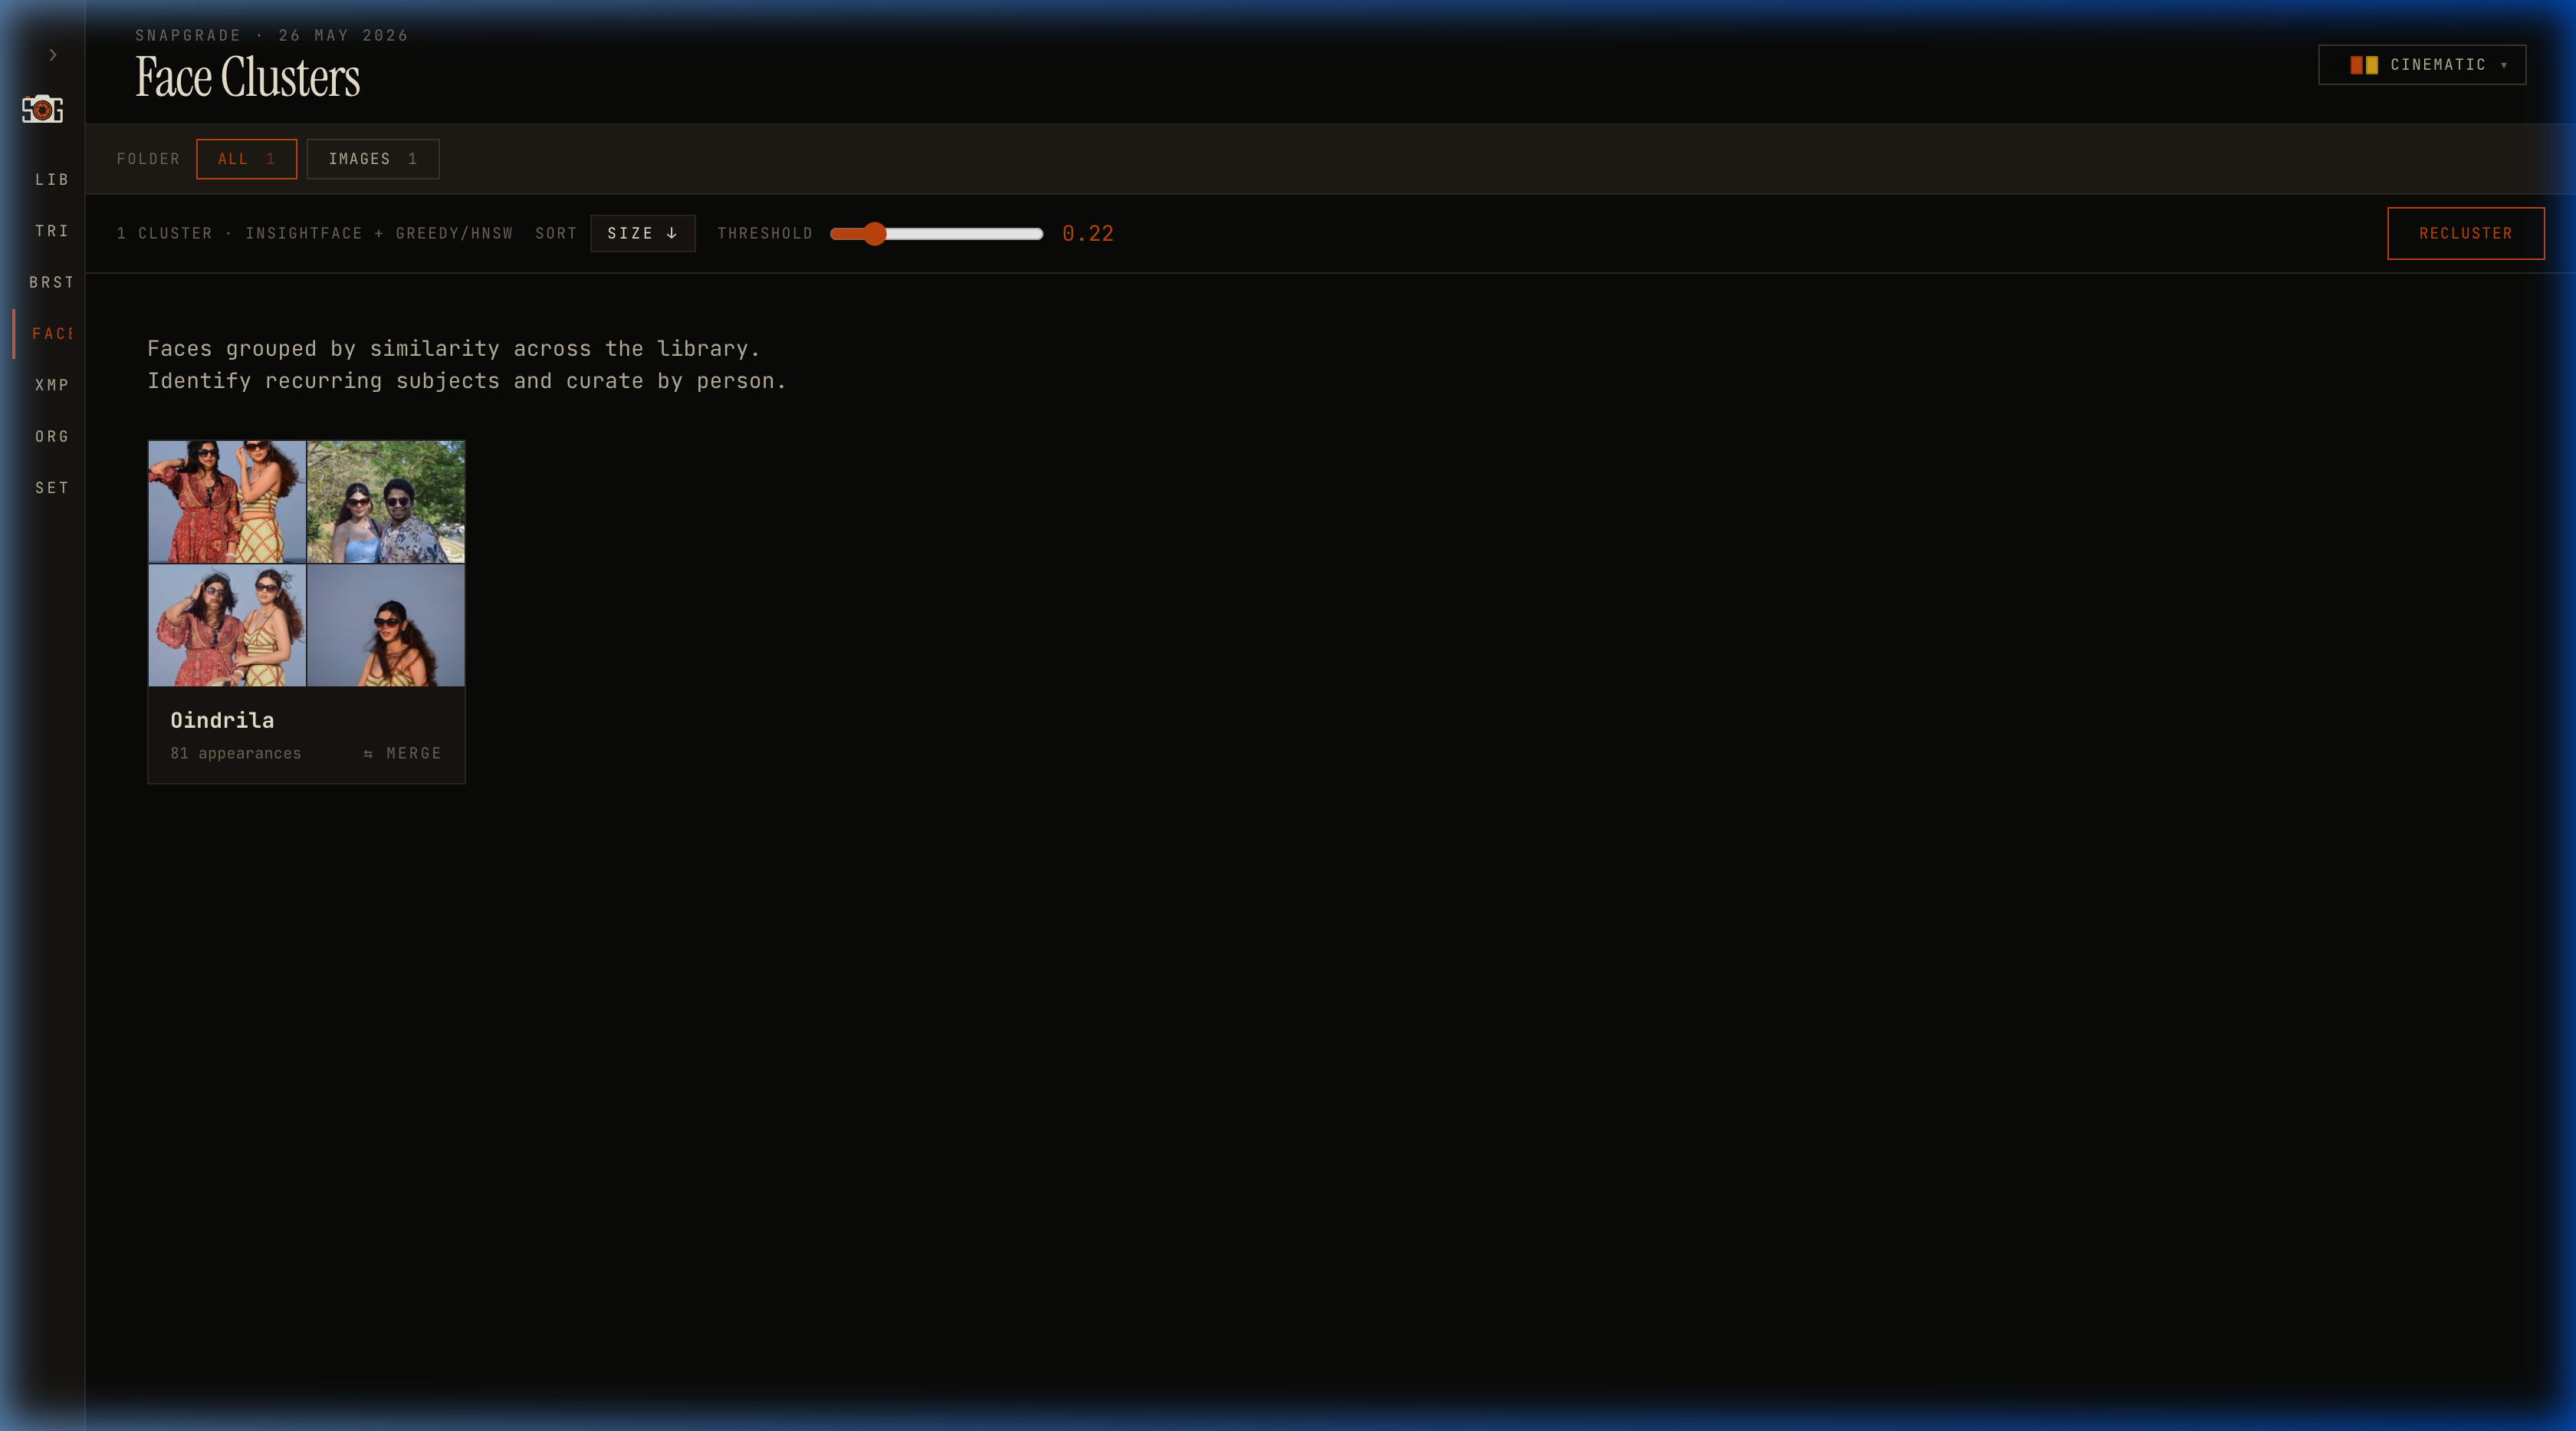 Face Clusters view. Each card represents one detected person, with the appearance count and a quick “view all” link into a filtered Triage.
For event work — engagements, birthdays, weddings — this is the difference between scrolling through 2,000 frames and pulling every shot of the bride in one click.
Face clustering is opt-in: run uv run snapgrade faces after analysis, or tick Cluster faces in the Library intake form.
The Darkroom: Move a Slider, Re-rate the Library
Every threshold and weight that drives a verdict lives in the Settings screen, branded as The Darkroom. Move a slider and the entire library is re-classified instantly — no images are re-analyzed, because the underlying metrics are already cached.
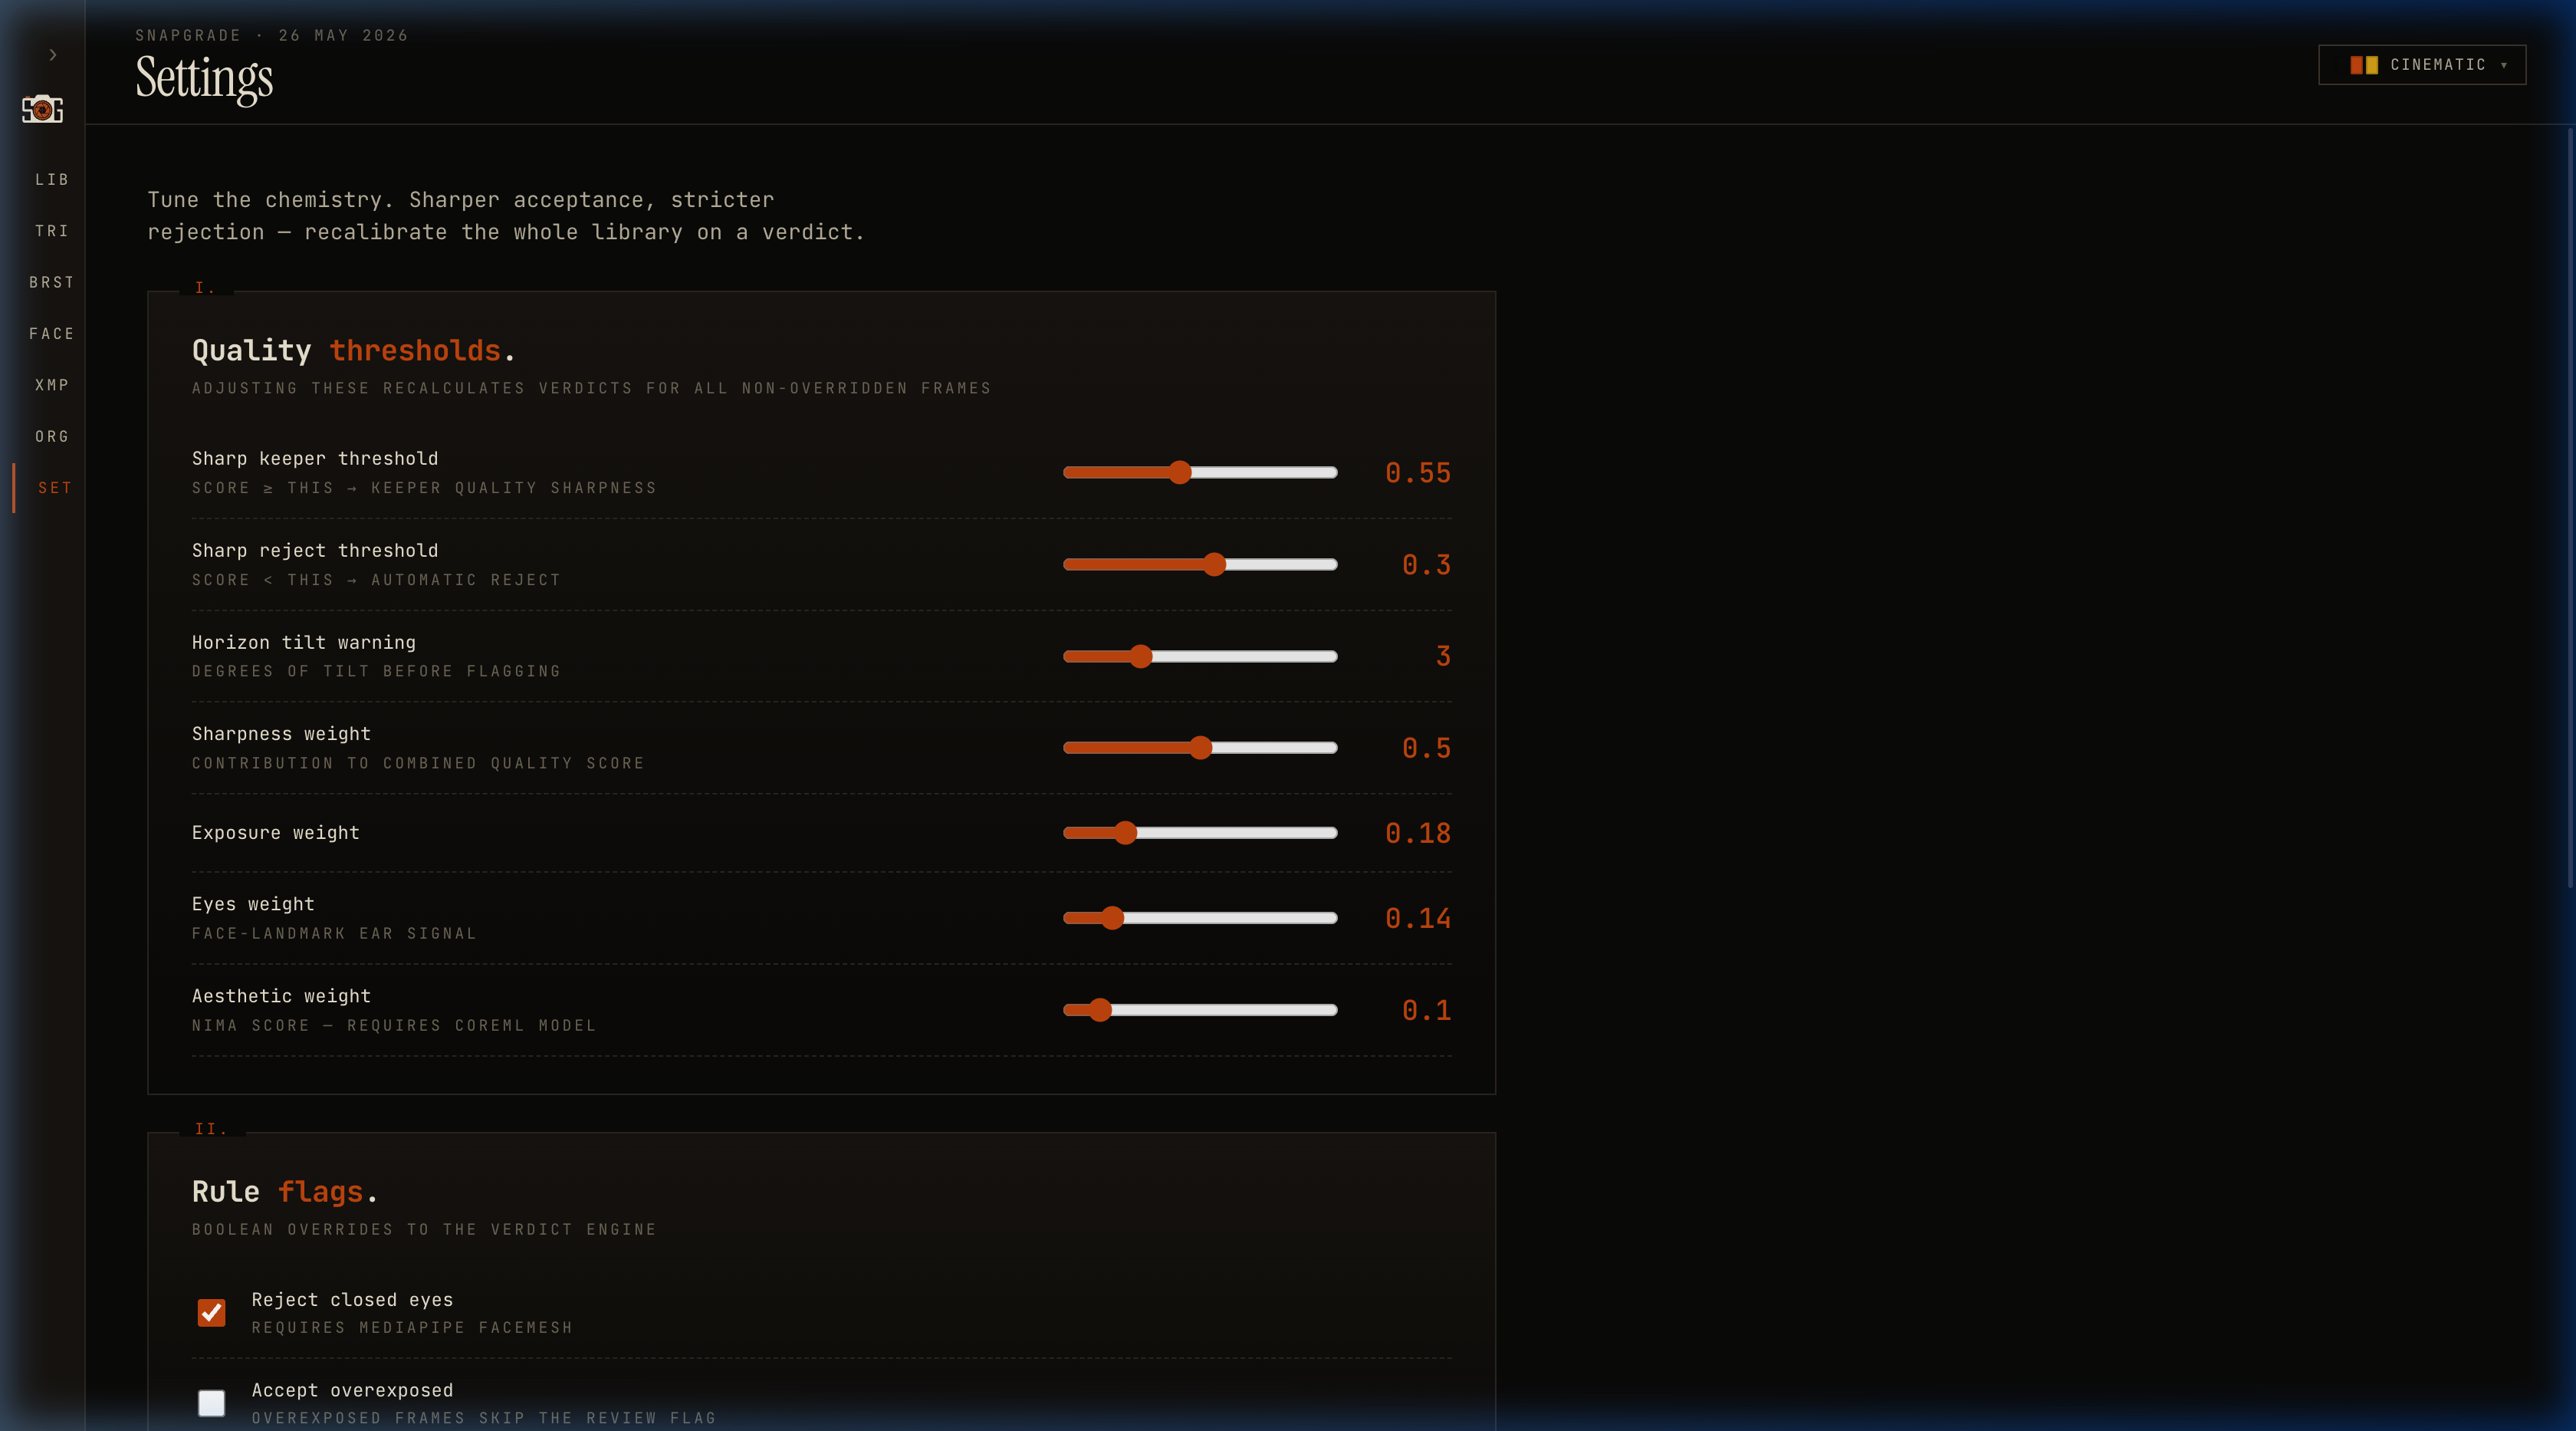 The Darkroom. Sharpen acceptance, loosen rejection, or rebalance the weights — verdicts update across the whole library instantly.
The exposed controls:
- Sharp keeper threshold (default 0.55) — above this counts as keeper-grade sharpness.
- Sharp reject threshold (default 0.30) — below this, automatic reject regardless of other scores.
- Horizon tilt warning (default ±3°) — surfaces as a warning chip, never auto-rejects.
- Weight sliders — sharpness, exposure, eyes, aesthetic. These compose the star rating from the underlying metrics.
- Rule flags — toggle hard rejections for closed eyes, overexposure, underexposure.
Portraits? Push the eyes weight up. Architecture? Drop horizon tolerance. The system is built to be tuned, not just used.
Build the Folder Tree You Wanted in the First Place
Once you’ve triaged, the Organize screen — The Hierarchy — lets you restructure. Define a folder template using tokens: variables that expand from image metadata.
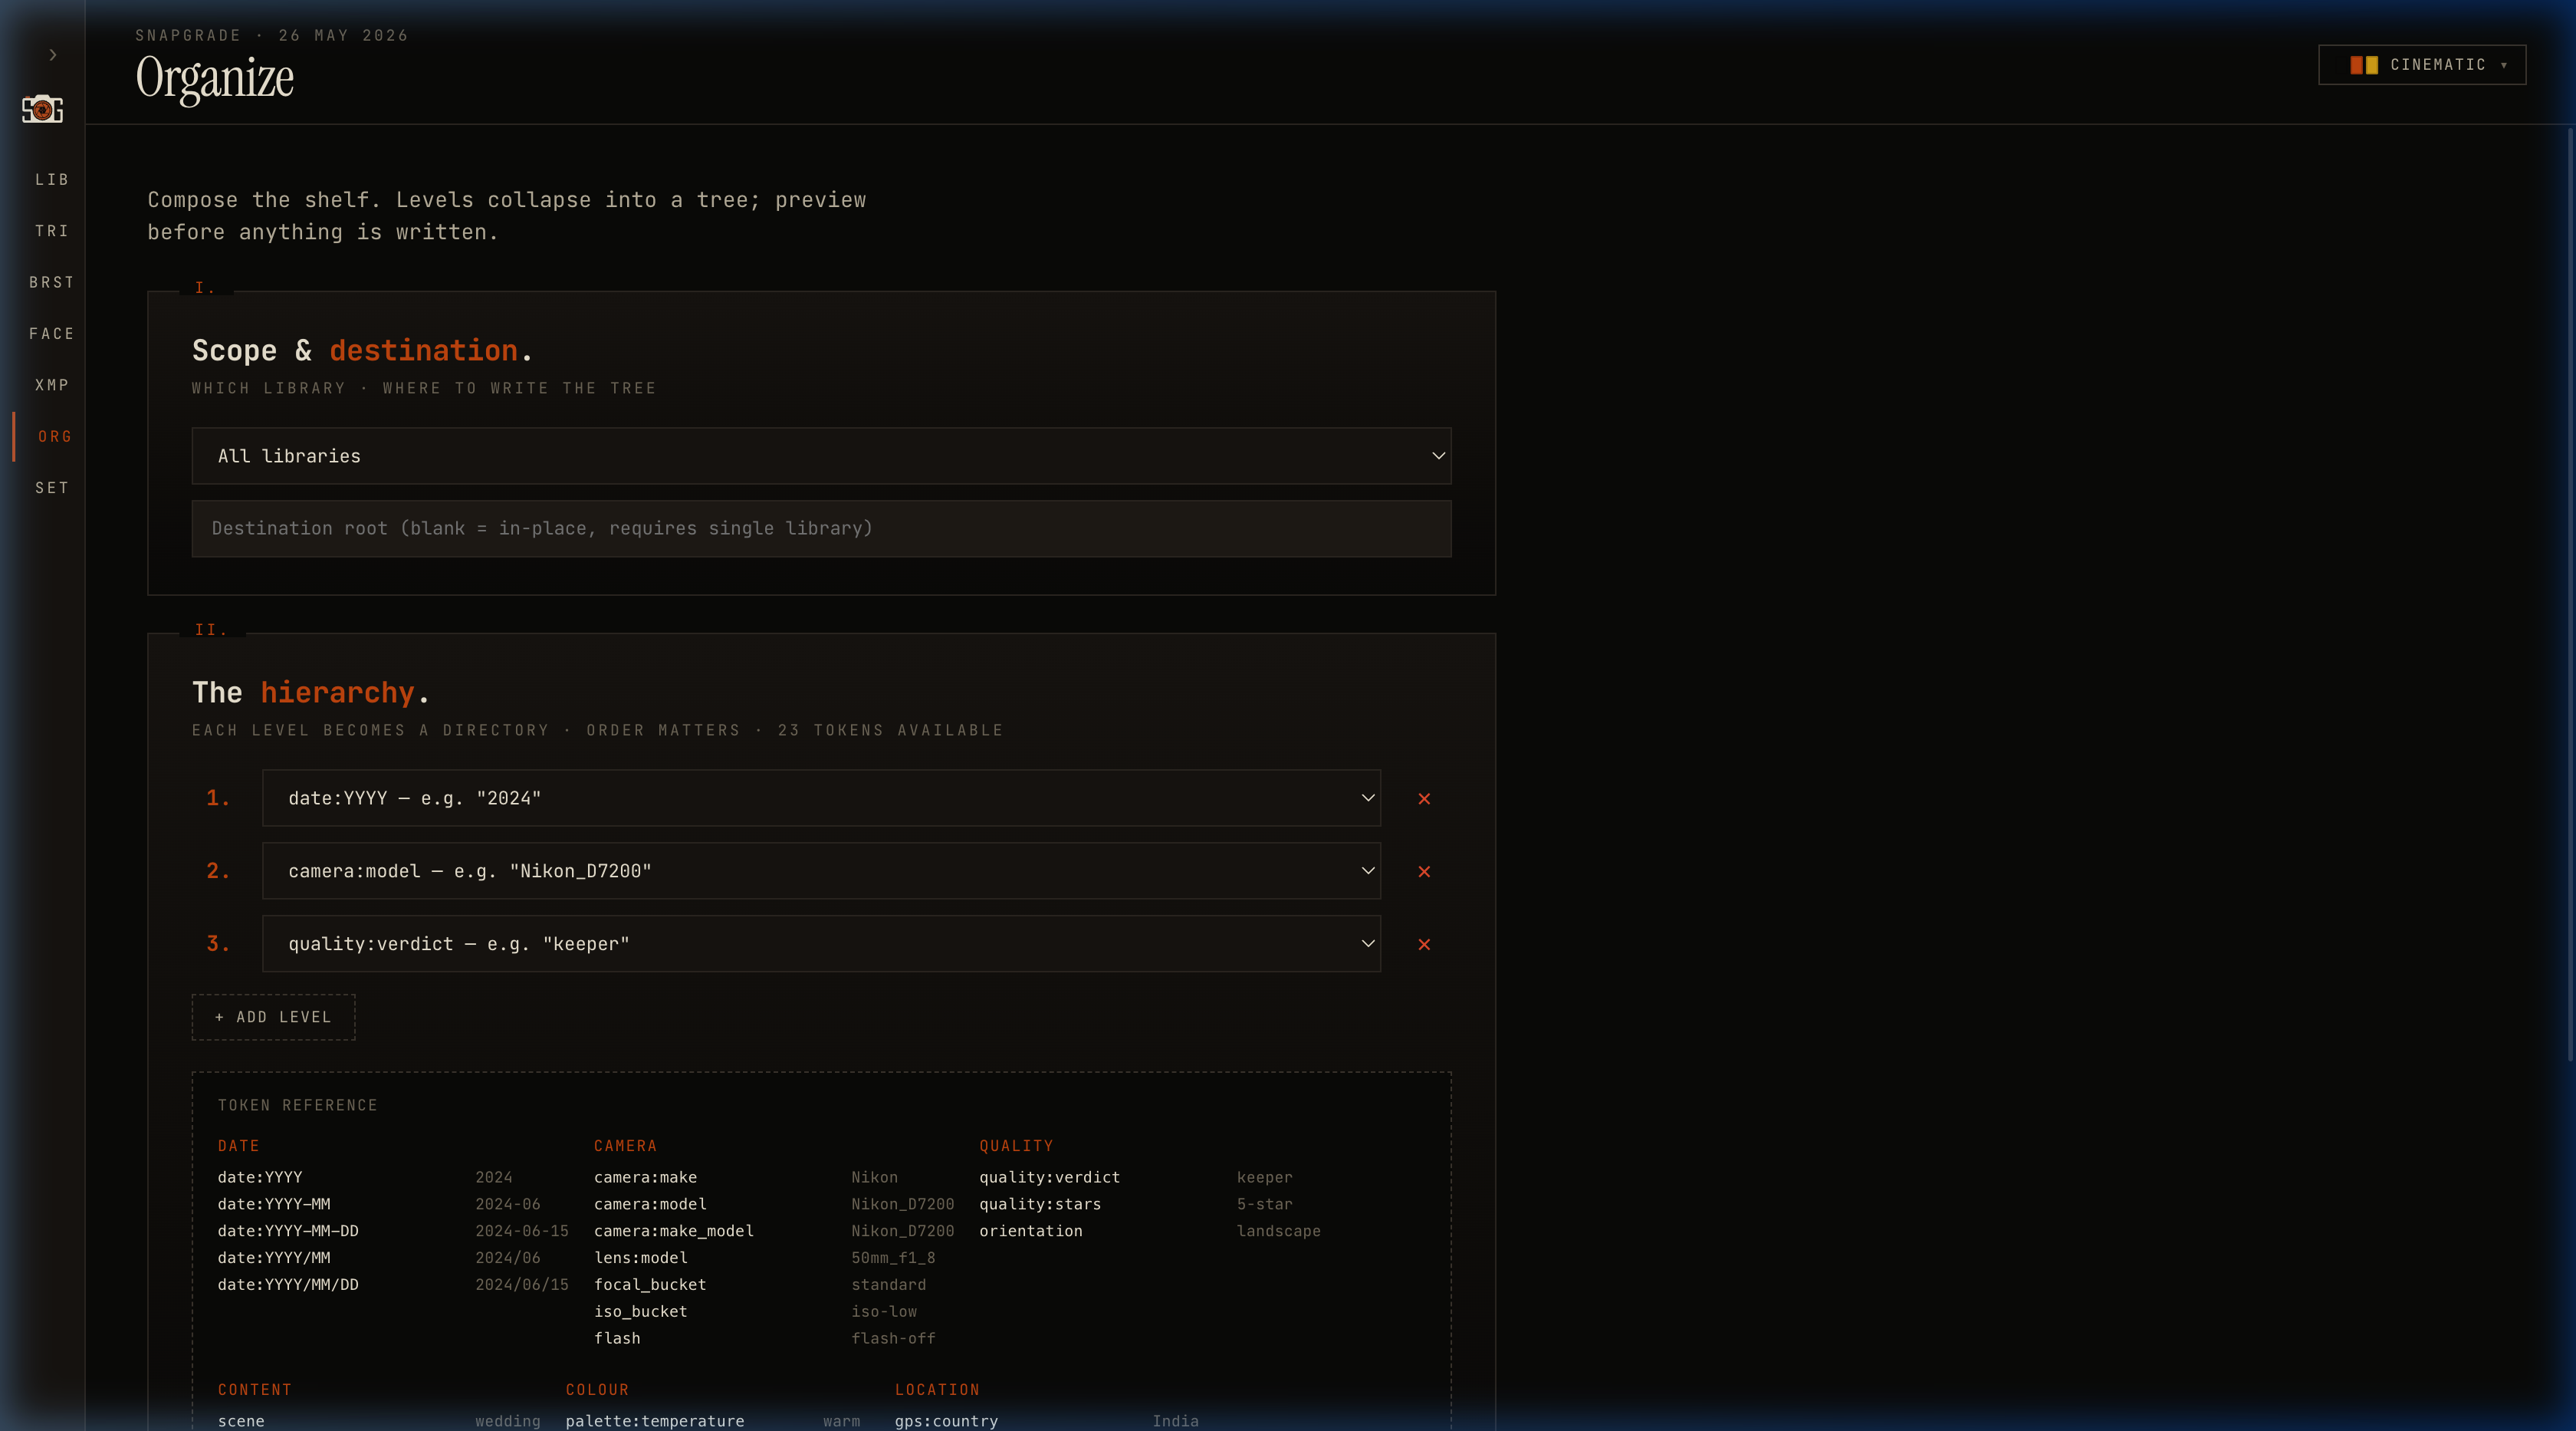 The Hierarchy builder. Add ordered levels; SnapGrade previews the folder tree before any file is moved.
A typical setup:
{date:YYYY}/{camera_model}/{quality:verdict}
Tokens include date components, camera make and model, scene type, ISO bucket, verdict, star rating, palette/season, GPS — all listed in the on-screen reference table. The / separator nests them: {year}/{month} → 2025/May/, {year}/{month}/{scene} → 2025/May/outdoor/.
You can move files or create symlinks (originals stay put). Symlinks are the safer default if Lightroom is also managing the files.
Hand Your Ratings to Lightroom
Every rating SnapGrade assigns — verdict, star count, rejection reasons — can be written to an XMP sidecar alongside the original image. XMP is the open standard Lightroom, darktable, Capture One, and Bridge all read natively.
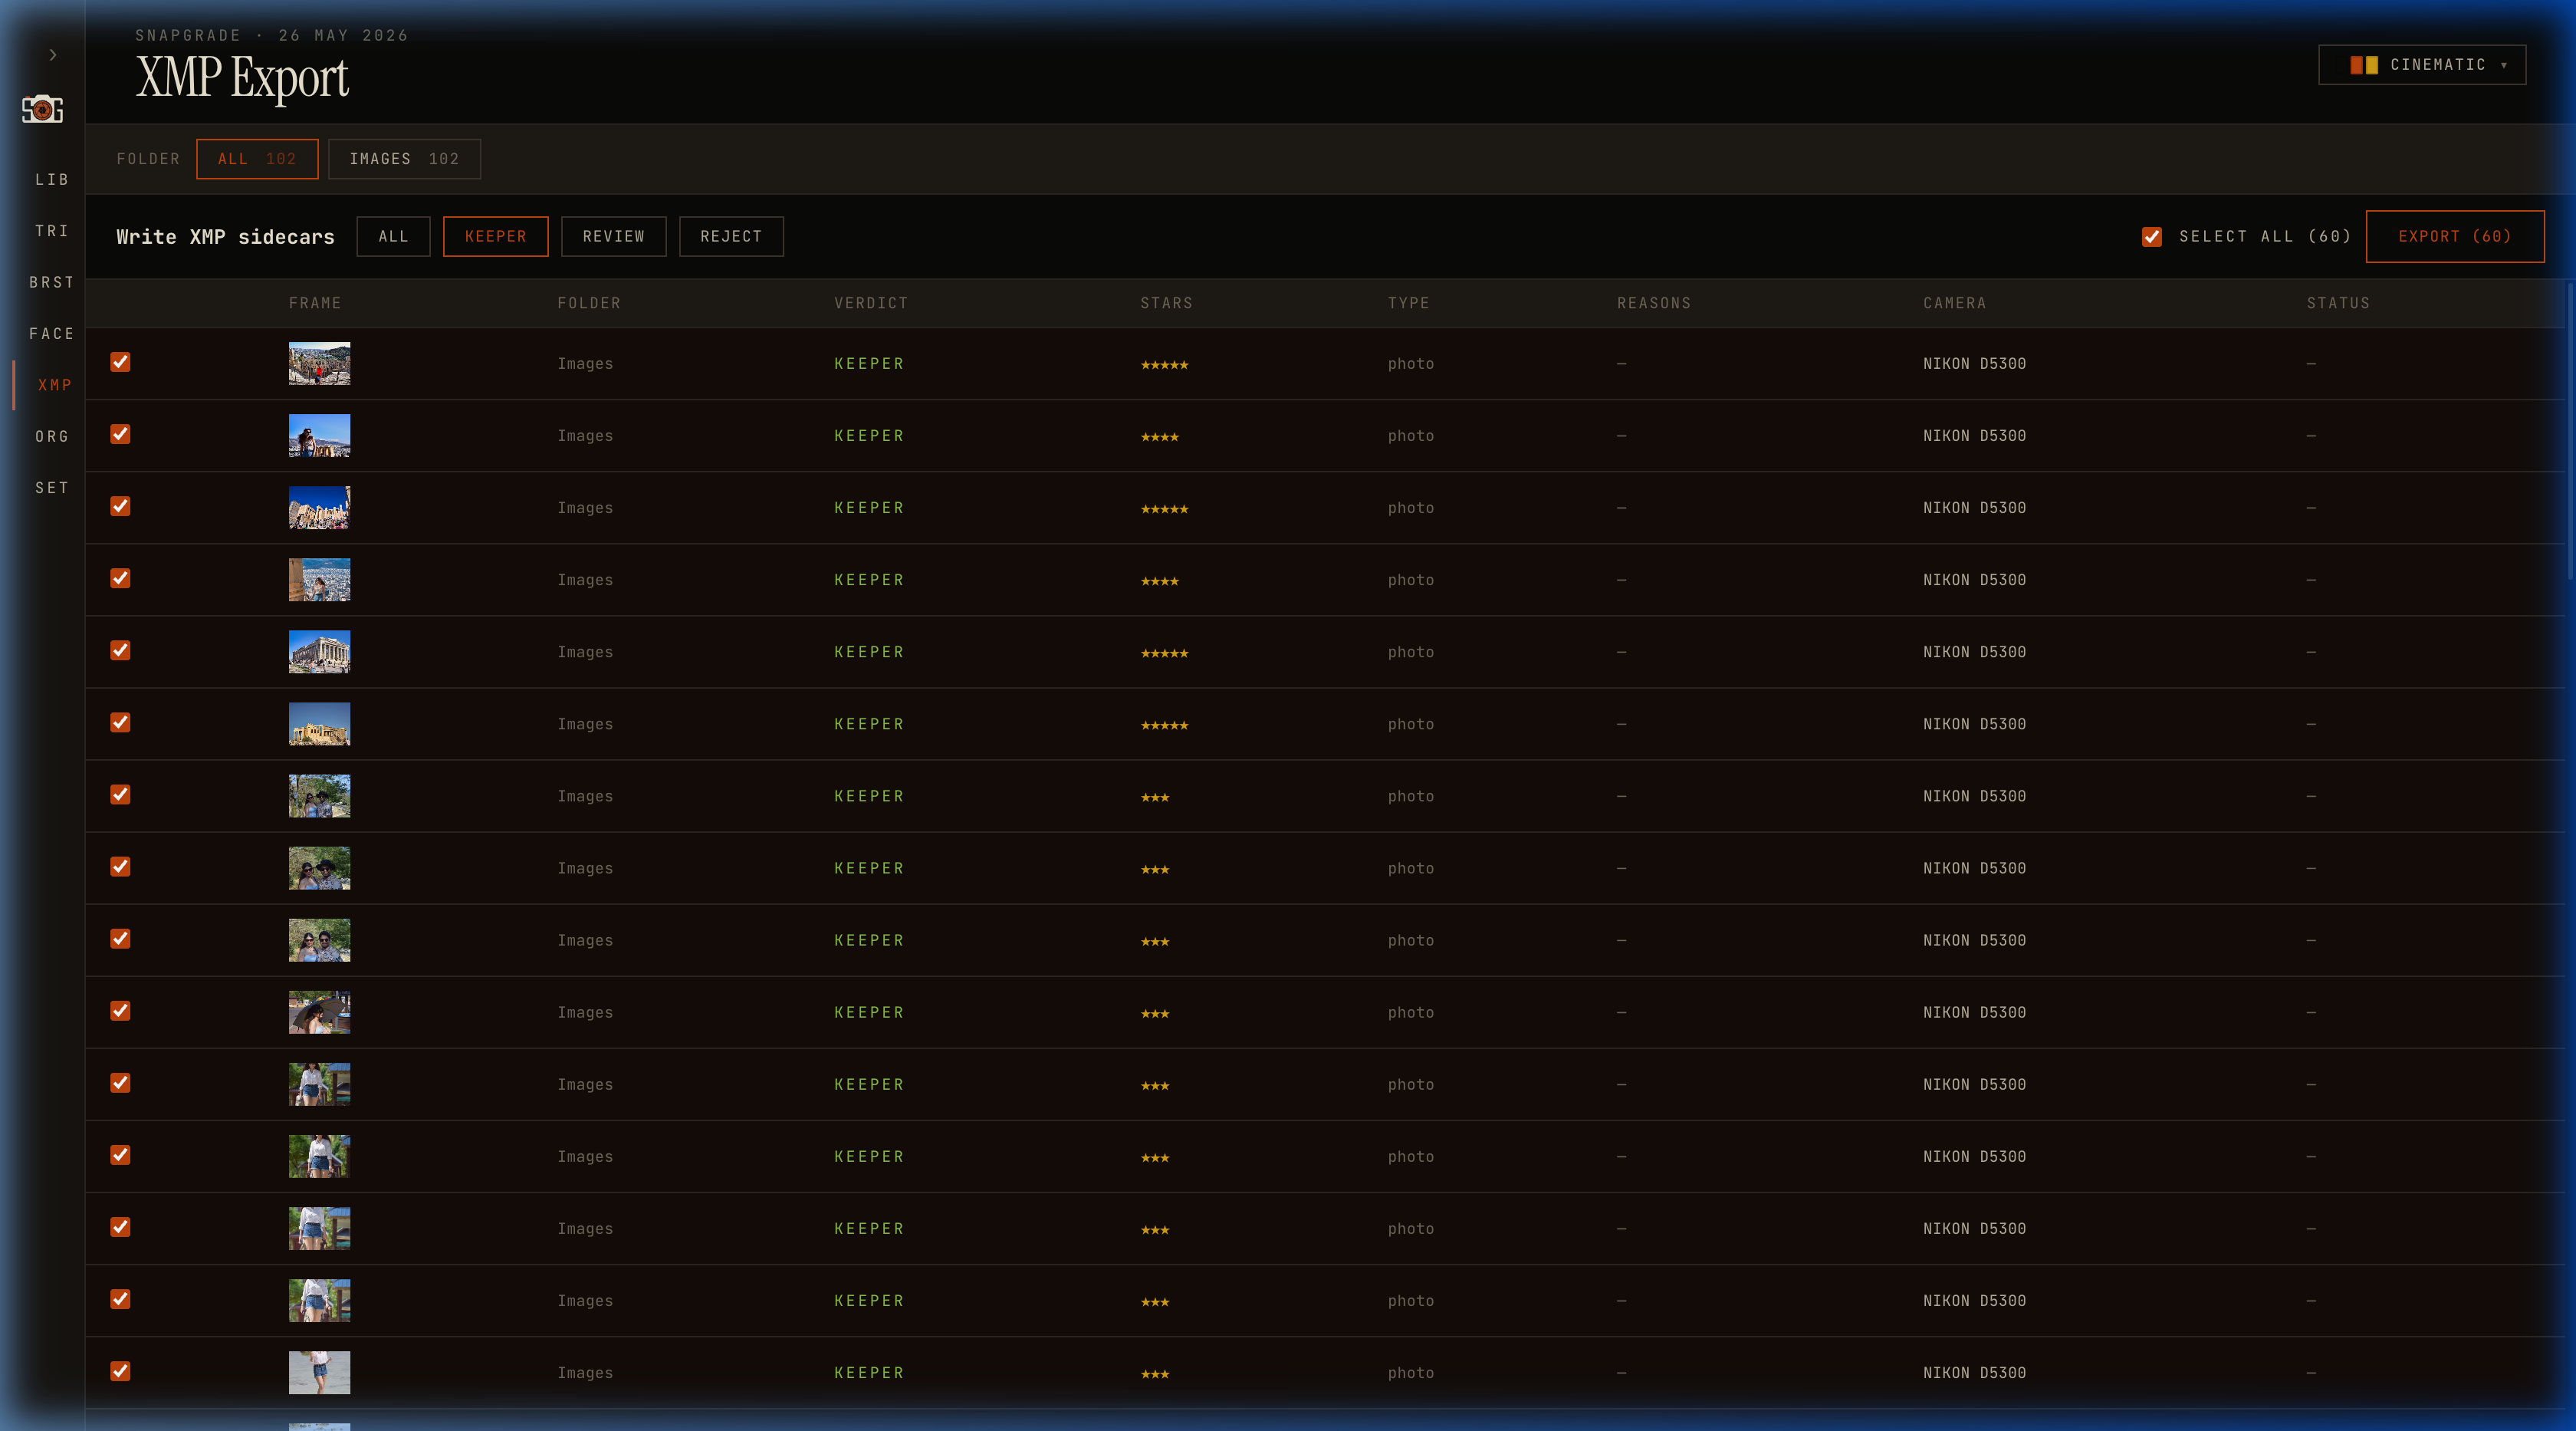 Batch XMP Export. Filter by verdict, select what you want to write, and SnapGrade lays sidecars next to your originals.
From the CLI:
uv run snapgrade write-xmp /path/to/your/photos
Or trigger from the Batch XMP Export screen. Open the folder in Lightroom afterwards and the ratings are already there: five-star keepers, one-star rejects, colour labels on review-flagged frames. SnapGrade becomes your first pass; the editor you already pay for does the second.
Three Themes for Three Lighting Conditions
Culling at night in a dark editing suite and culling outdoors on a bright laptop screen need different visual treatments. SnapGrade ships three themes from the top-bar dropdown — switching is instant, no reload.
Film Lab (default)
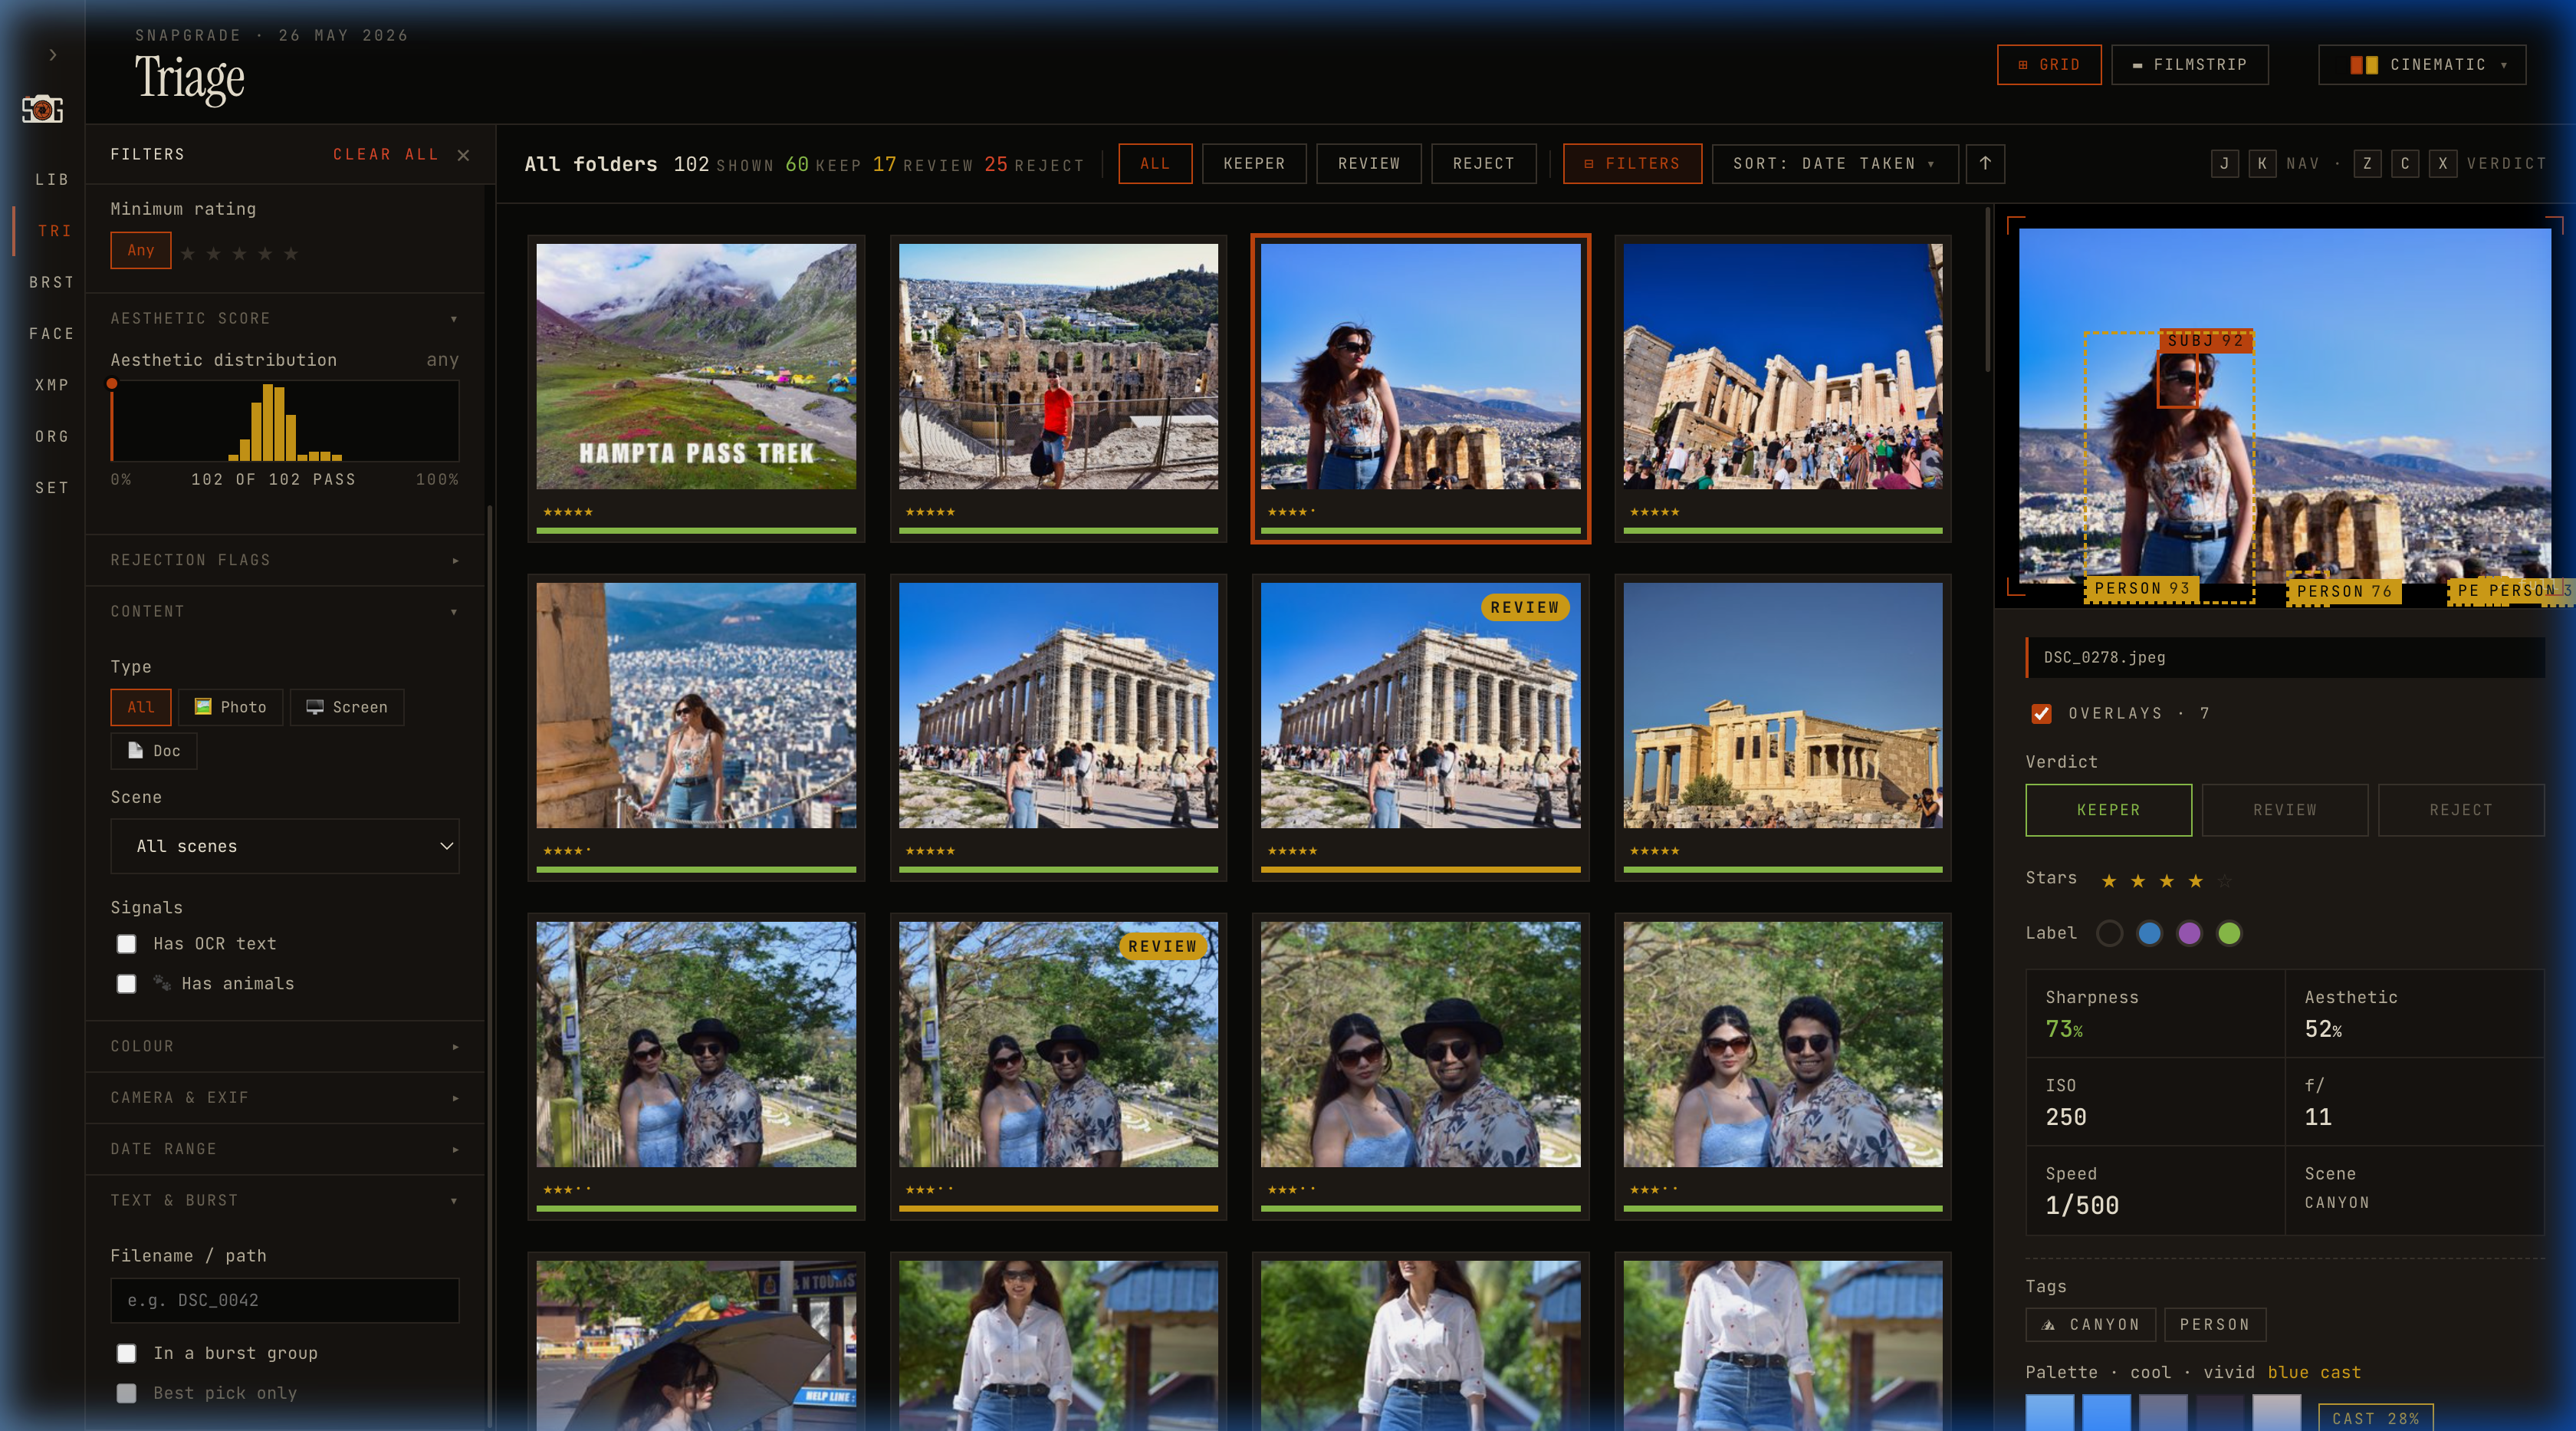 Film Lab. Warm amber accents on near-black with a film-grain feel. Best for low-light editing.
Modern
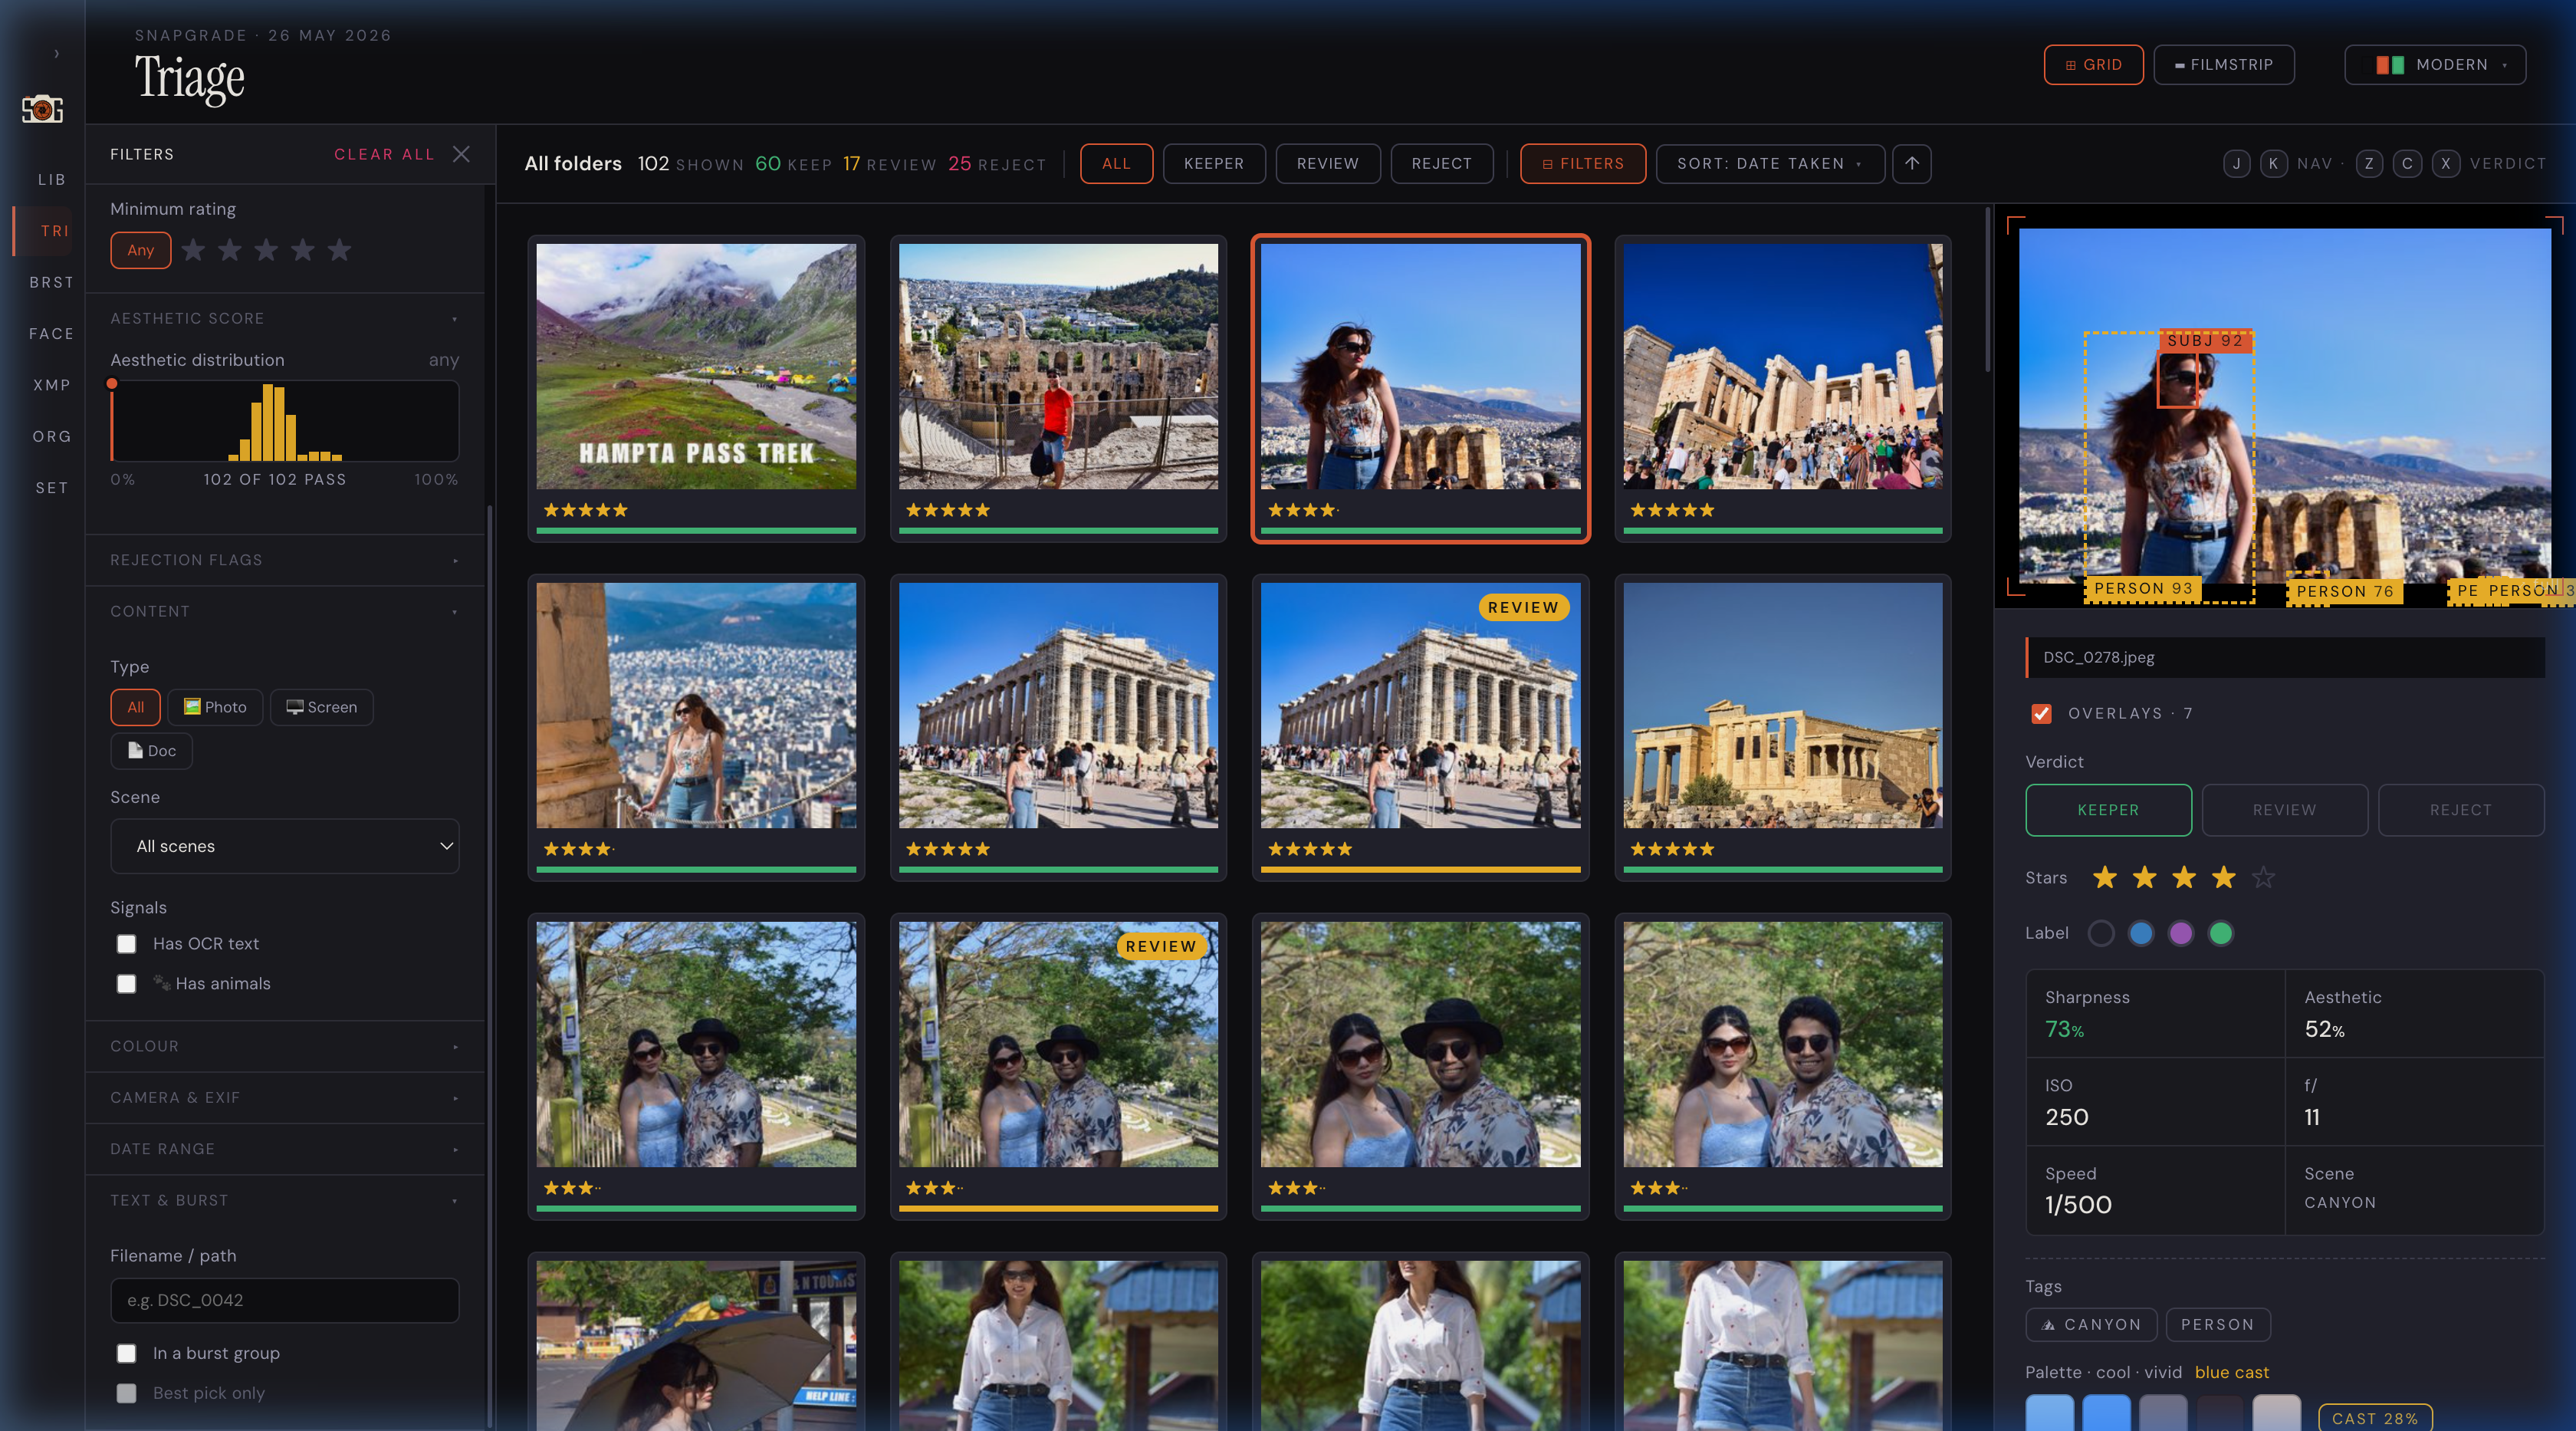 Modern. Cleaner, cooler dark mode with sharper UI chrome. Best for typical screen workflows.
Light Pro
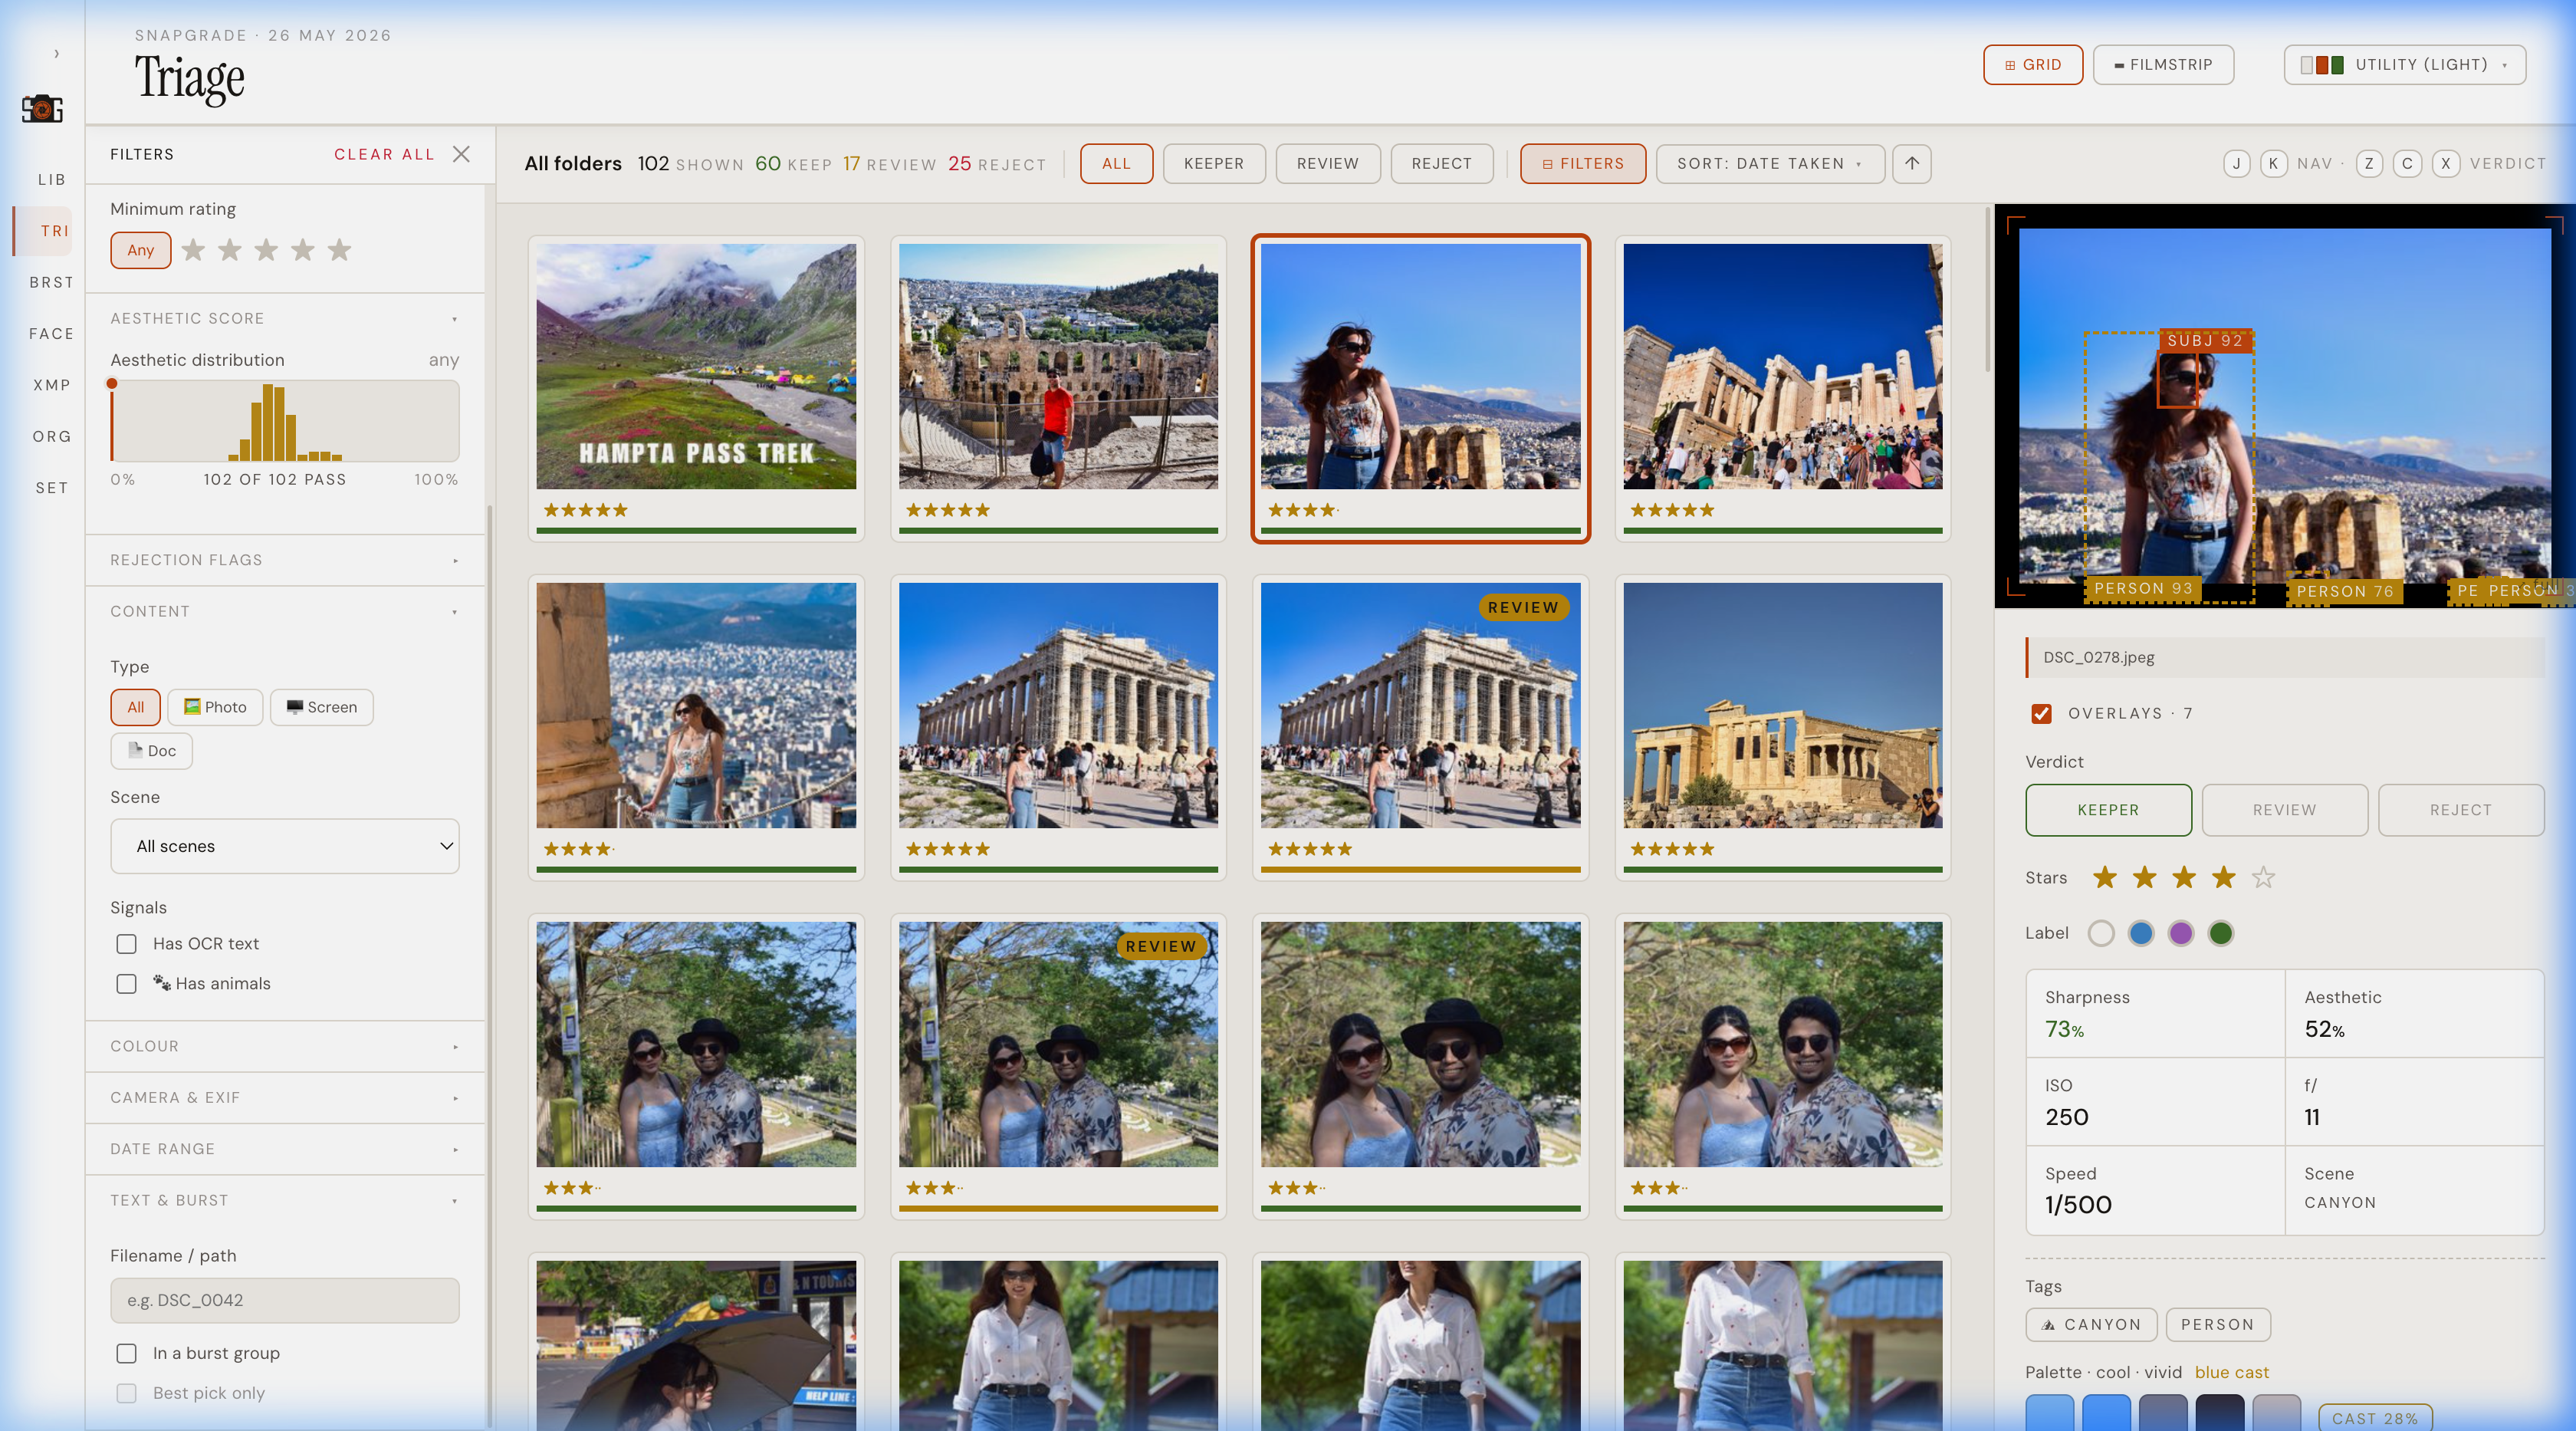 Light Pro. A calibrated light mode for bright environments and colour-accurate triage. Best for daylight on a laptop.
All three preserve the same layout and information density; only the palette and surface contrast change. Pick whichever doesn’t fight your eyes for the next hour.
What SnapGrade Is Not
SnapGrade is not trying to replace your editor. It never touches or converts your image files. It uploads nothing. It doesn’t learn from your corrections in real time — though you can override any verdict in Triage, and overrides persist.
The aesthetic score (NIMA via CoreML) is opt-in and only runs on Apple Silicon. Everything else — sharpness, blink detection, exposure, burst grouping — works on any Mac with Python installed.
Try It on Your Last Shoot
Full source, install instructions, and CLI reference on GitHub:
If you shoot more than a few hundred frames a session and currently cull by hand, point it at a recent folder. The first re-run after analysis completes in under a second — every result comes from the local SQLite cache.